3 Standard Web Server Software
A web server software is just a piece of software running on a server that listens on port 80/443 (or any other port that you have configured to listen to HTTP requests and send back responses. The responses sent back are typically just .html files along with the various styling and JavaScript files.
3.1 A Simple Web Server
A web server itself is relatively simple and can be written in less than 50 lines of Python code. However please note that this is very limited and wide open to security problems but lets examine a few important things about the code that you find below.
import os
import socket

HOST = "0.0.0.0"  # Standard loopback interface address (localhost)
PORT = 80  # Port to listen on (non-privileged ports are > 1023)

# Create a socket, set it to reuse the socket upon closing and then "bind" (attach) to the port
# and wait for incoming requests
s = socket.socket(socket.AF_INET, socket.SOCK_STREAM)
s.setsockopt(socket.SOL_SOCKET, socket.SO_REUSEADDR, 1)
s.bind((HOST, PORT))
s.listen()
while True:
    conn, addr = s.accept()
    print(f"Connected by {addr}")
    while True:
        data = conn.recv(1024).decode('utf-8')
        if not data:
            break
        lines = data.split("\r")
        request_line = lines[0]
        request = request_line.split(" ")
        uri = request[1]
        print(uri)
        full_path = "document_folder" + uri
        if not os.path.exists(full_path):
            response = "HTTP/1.1 404 Not Found\r\n"
            full_path = "document_folder/error404.html"
        else:
            response = "HTTP/1.1 200 OK\r\n"

        file_stats = os.stat(full_path)
        file_size = file_stats.st_size
        web_file = open(full_path,"rb")
        file_content = web_file.read()
        response += "Connection: close\r\n"
        response += "Content-Type: text/html\r\n"
        response += "Content-Length: " + str(file_size) + "\r\n"
        response += "\r\n"
        response = response.encode('utf-8')
        response += file_content

        conn.sendall(response)
At the top of the file we find a couple of constants called HOST and PORT. The HOST parameter is the IP address on which the web server will listen for incoming connections. It is entirely possible that the physical server has multiple IP addresses and you are only interested in serving up content from one of the IP addresses. The server could be connected to an internal and an external network and we only want to provide web pages for the internal side in the form of an intranet. By listening to the ip address 127.0.0.1 we would only allow for connections from the local machine. Although this sounds a bit strange there are actually many times that you want this type of arrangement from a security point of view and we will see this later in the book.
The port number of course is the port on which the web browser would be connecting. Standard non-encrypted HTTP traffic usually uses port 80 but you could switch this to any other port number. Most operating systems will not allow non-privileged applications bind to port numbers below 1024 so you might be prompted for an administrator password if you try to use port 80. Note that you cannot have two web server software listening to the same port at the same time because the operating system wouldn’t have any idea of which application to hand the incoming packet to. A socket is a programming construct which is an endpoint of a two way communication link.
Once the socket has been set up, the web server software now enters an infinite loop accepting connections from clients since you probably want to service requests on your server forever or at least until you shut down the server. Once connected to by one of the clients we will continue to service requests from the client without having to shut down the connection but we could have set things up to service exactly one requests and close the connection. Remember the discussion of “Connection: close” from the HTTP protocol section?
In the simple web server software that we wrote we take the incoming request and split it into a bunch of lines and then look at the first line and extract the URI (second parameter) from that line since it will contain the name of the file. A real web server would examine many aspects of the incoming request such as the HTTP version number, the method (GET, POST, etc) but we assume that method is just a GET and try to find the file.
Our mini-server then tries to find the file inside the document_folder directory. If it is found then we get the size of the file, read the file and send back a 200 OK response. If the file was not found we change our response to 404 Not Found and send back a special file called error404.html. I could have created the response without reading from the file but decided to include the file because we will see this type of thing when we start to configure the real web servers later.
Once we have the file content and size we create the response and send it back. You will notice something a bit odd in the code. I have converted the lines of the response into a “byte” object and then appended the file to the end of the byte list. The reason for this is that some files might be in a binary format such as images.
Although you would probably never be writing a web server from scratch, there are several very important concepts that need to be pointed out here so we will write them in bullet points because we will be seeing these things when we hit the section on configuring Apache and NGINX.
- Whenever you make change to the web server you must stop and restart it. In the real web server software we would not be changing the source code, unless you were a developer, but you could be changing configuration items such as the name of the document folder or the name of the file that is sent back along with the 404 error code.
- The files sent back by the server live in a specific location on the server and this is usually different than the source code or even the configuration files for the server. We refer to this as the document root.
- Continuously closing and reopening the connection will cost time but makes things simpler to program. A real server would try to use the keep-alive setting to prevent the new connections so that all of the items on a page, such as CSS files, JavaScript files, images, etc can all be loaded with a single connection.
- The server can only handle a single client at any given time. If a server runs multiple threads and/or processes (for those who have studied operating systems) then it can handle multiple clients at the same time. A large number of threads/processes will require more RAM so there is always a decision to be made to balance response time vs resources. In a later part of this course we will explore how to measure performance and how to tweak things.
3.2 Ubuntu Services
If we wanted to actually use our Python software that we wrote in the earlier part of this chapter we would need to figure out a way to keep it running all of the time. Obviously we wouldn’t want to have to open Idle or PyCharm and run something by hand each time that we reboot the server and of course if the software does crash we don’t want to have to run back to the computer so that we can restart it. Most web servers run in the background as a “service”. Each operating system has its own way of managing these background services. Since we are using Ubuntu in our course, we will be focusing on Systemd but only from a perspective of managing existing services, not for creating services (this is for another course).
If you were to head off to the folder /lib/systemd/system folder you will find a list of all the background services that could be run on your system. If you have things like the apache web server installed you will find a file called ‘apache2.service’. The name of this file is the name of the service that you will need to reference when trying to control the services.
The command ‘systemctl’ is used to control services and its general form is:
systemctl command service
There are around 60 commands that can be used to control services but the most common ones are the following:
- status: Provide a detailed description of whether or not the service is running and if there are errors, some of them will be shown here. To get the details of the errors, you will often have to look at the log files.
- start: Start the background service.
- stop: Stop the background services.
- restart: Stop and start the background service. You can use this command when changing the configuration but most of the time you would probably use the reload command instead.
- reload: Send a signal (it is a hangup signal for those who have seen this in the operating systems course) to the service. Normally the service will reload its configuration file. This is preferred over a restart because it will be generally faster. However if the service is not running you will get an error message saying that it is inactive and cannot be reloaded. The solution of course is to start the service. If you do this during class, your instructor will make fun of you and refer you to this section of the textbook.
- enable: Mark the service for automatic startup when the physical server is rebooted.
- disable: Mark the service so that it does not startup automatically when the physical server is rebooted.
3.3 Web Server Softwares
In this section of the chapter we will look at the two main web servers that exist on the internet in 2022, Apache and nginx. At one time the Microsoft IIS server would have been a very strong contender to be included in the book and the earlier versions of our Web Server Management course even covered it but in the past few years IIS has nearly vanished off the radar.
The idea behind this section of the textbook is to provide the background information on various important configuration concepts used by all web servers but avoid specifics about how to configure things for apache and nginx. A separate section on the two servers is found later in the chapter after we have the background details described. Although it is tempting to skip directly to the configuration details for the specific servers in order to get your labs completed sooner, I encourage you to read the information in this section first and then move to the specific server.
3.4 Web Server Configuration Parameters
The number of items that is available to be adjusted in a web server software is simply too much for me to try and include everything in this book. The purpose of this section is to cover the bare minimum settings that we need to look at in our web server management course. For more details, please refer to the documentation found for each server online.
In the world of Linux configuration files are generally kept in the “/etc” folder. Sometimes an administrator might have kept them in “/usr/local/etc” or even some place like “/opt/etc” but generally you will find that most Linux distributions will place their directly supported package configuration files in “/etc”.
3.5 Active and Available Configuration Files
Most web servers use configuration files for controlling items such as which port will be used and which folder will contain the HTML files that will be served up when the server is running.
Both nginx and apache2 use the concept of “active” and “available” sites. The term “active” means that the server is currently using that particular site while “available” means that you have a configuration file that has been created and ready to be used but is currently not actually being used. The idea is that you could temporarily disable one of the sites and enable a different site to do things such as putting a site into maintenance mode while you make some changes to it. The ability of having things as available rather than active allows you make changes to a site without actually affecting the server until you are ready.
Both the nginx and apache2 servers keep a folder of available sites in the configuration area (generally /etc/apache2 or /etc/nginx on Linux computers). The servers also keep a folder of enabled sites in the same configuration area but generally in different folder. The general way of how to enable a site is to go to the enabled sites folder and then create a symbolic link to the configuration file in the available sites folder with a relative path. This does lead to one small problem which is the configuration file will appear in both places when a site is active but of course they are actually the same file. Editing the file in either place will result in the same thing. Disabling a site means that you need to erase the symbolic link (not the actual file!).
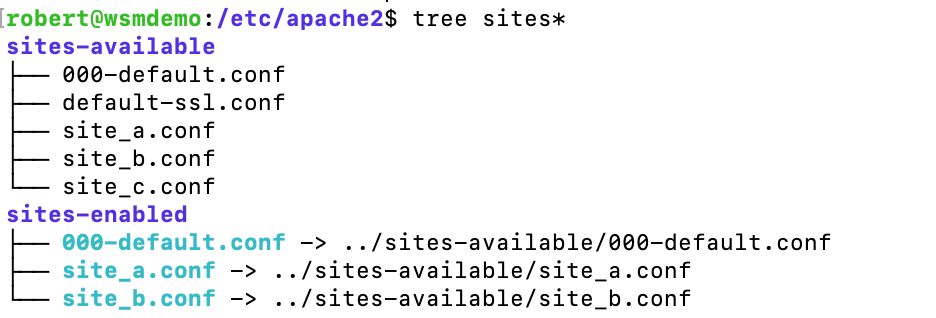
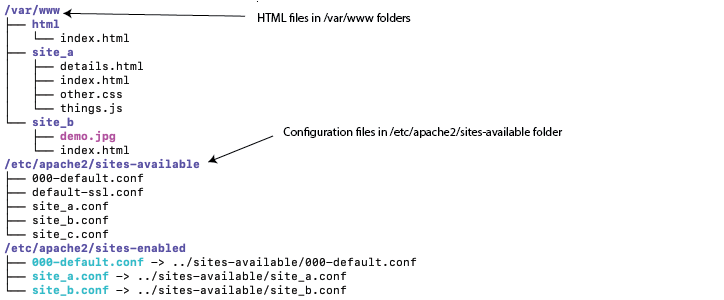
The image shows that we have 5 websites on this particular server but only three of them have been enabled. The enabled sites are actually symbolic links to the available sites. It it possible to copy the files from sites-enabled to sites-available or even just completely ignore the sites-available folders but this goes against how the package managers expect you to use the server and will likely cause you more trouble than anything else. The example show is from Apache but nginx uses the same technique. The symbolic links are relative paths but absolute paths also work if you prefer typing them.
An important thing to note here is that after sites are enabled or disabled (or any modification is done) you will need to ask the server to reload its configuration files.
To check which sites are enabled you just need to go to the enabled sites folder and do a directory listing. Of course just because you see the files there doesn’t mean that they are active! You need to ask the server to reload its configuration file after making changes and you need to pay attention to error messages. The apache server is nice in the fact that it provides you with some tools to help you enable and disable sites on Ubuntu but you will need to know both the easy way and the more difficult way by using symbolic links.
3.6 Preflight Check
In the world of aviation, pilots go through a pre-flight checklist where they verify that the aircraft systems are working correctly. It is better to take a few minutes on the ground to ensure that things will work rather than to find out after takeoff that some very important equipment is not working.
Most web servers have tools available that can be used to check things like configuration files before you try to launch them. Although in our course we could care less if the server crashes when we try to change a port number, if this was a real life system with hundreds of sites you don’t want to crash the entire server because you left out a > symbol somewhere. Before reloading any configuration files, it is strongly recommended that you run the tool for the software to make sure that you don’t have issues. Unfortunately these preflight tools do not always catch every error but they are likely to catch most errors that are typically made in this course. In fact if you are having problems, the first thing your instructor will do is to ask you if you have ran the configuration file test script and if you haven’t they will probably not help you with any further debugging.
3.7 Modules and Configurations
Both of the mainstream web servers use the concept of modules for dealing with features such as allowing for HTTPS communication or connecting to a scripting language such as PHP. The configuration and modules usually live in modules available and modules enabled folders just like the sites. Often however when you enable modules you will need to actually restart the server rather than reload the configuration file because the module likely needs to be loaded along with the server software when it starts. The apache web server is helpful because it reminds you to restart the server after you enable a module.
There are only a few times in the course where you will need to deal with modules for the web server.
3.8 Document Root
The most important configuration parameter for a web server is the document root setting. This setting will decide exactly where the .html files (along with the other files served up) will be found. The web files will be usually kept in a very different part of the system compared to the configuration files and a typical location is ‘/var/www/’ although this can be changed.
3.9 Log Files
Each time that a user visits a website a small amount of information such as what did the user try to do, what time did they do it, and what IP address where they coming from are all recorded. This can be useful for performing analysis to determine if some pages on your website are popular and from what geographical location your visitors are viewing your content from. The information about the visitors is stored in the access log.
A more important log file is the the error log which records every problem that is encountered by the server while it is running. Since a web server runs in the background, looking at the output of the program is more challenging and the software allows you to configure the location for the log server. Things like 404 File Not Found errors and even configuration errors from the software itself will be written to the log file. When a server is not working as expected, the first thing you should do is to look at the log file.
A useful tool when viewing log files is to use the “tail -f” (tail follow) command which will show the last 10 lines of a file and keep the window active. Normally when debugging problems, I will open a terminal window and run ‘tail -f’ and leave the window open while I visit the site. This will give me a semi-live view of the errors that just occurred.
Trying to debug a problem without checking the log file is a poor way to find the issues! Always check the log files to see what is happening.
The actual name and location of the log files is generally a configurable option. The configuration is usually done one a site-by-site basis so that you can put different site results into different log files to help organize access logs and problems.
3.10 Custom Error Documents
When a visitor requests a page that has a problem such as an invalid link or a page for which authentication is required the user will see a message. The message that they get back is somewhat related to the response codes that we learned about in the previous chapter. Take the 404 not found message as an example. Although the server only needs to return a single HTTP response line like “HTTP/1.1 404 File Not Found”, most servers will also include an HTML file containing a nicely formatted page telling the user that the file was not found and providing a link to the main page of the site or the email address of somebody they could contact if they wanted to find the actual page.
The default messages generated by the web servers are somewhat intimidating and are rather plain looking and not that informative. Most web developers would like to see something a bit more friendly and web server software allow you to configure custom error documents that fit the theme of the site. Generally to configure these pages, you just need to know the HTTP response code you are trying to create the page for as well as the document you want to send back.
3.11 Redirection
We know from the HTTP section of this course that server side redirection is a way for a server to inform the browser that the resource they are looking for can be found at another location. We use redirection for doing things like sending a user from an HTTP site to the HTTPS site or for cases where some important document was moved from one location to another and we didn’t want to just serve up a 404 not found when the user tried to access the old location which might have been bookmarked.
There are two types of redirection commands in the HTTP protocol, 301 and 302. The 301 redirection indicates that the page has moved permanently to some other location while a 302 is just a temporary redirection and that the page might come back later.
When to use 301 or 302? Both work exactly the same from the users point of view but from a search engine point of view there is quite a bit of difference. Think of how Google works… every month/week/day Google crawls all the websites that it knows about and captures the words on the page and builds a database. If the Google crawler finds a 302 temporary redirect it will probably not do anything special with the page other than just crawling the page. If the crawler finds a 301 permanent redirect it could actually erase what it used to know about the page and replace it the new links.
The web server software usually allows you to redirect single files and even entire sub-folders to new locations.
3.12 Basic Authentication
If you recall from the HTTP section in the earlier chapter, basic authentication is just a way to require that some resources be protected using a username/password pair. This HTTP feature is not used very often in exchange for sessions and tokens which are much more flexible. This feature of a web server can be useful for protecting a simple website from being viewed by the public. It is useful if you are developing a new website and just don’t want the general public viewing the site because you are not finished.
One thing that is obvious is the need for usernames and passwords and a file in which to keep them. The password file contains both usernames and hashed passwords and can be placed anywhere on a system but of course this file should never be placed in a location where people on the internet could read it. When a request comes in to access a part of a website that is protected by basic authentication the server will reject the request with a 401 Unauthorized message and then the browser can either ask the user for the password or use the password that was just recently entered.

If the hashed password matches the one in the authentication file then the server will send back the response as usual. The browser continues to send the Authorization string for all further requests.
Basic authentication doesn’t allow for any type of customization of login messages and even simple operations like logging out do not exist. If you are designing a system that people log into you would stay clear of this type of authentication and implement sessions instead. Use basic authentication just to keep people out of a system that doesn’t provide a login system.
3.13 Port Binding
In the world of TCP/IP, different services bind (attach) themselves to different ports on the server. The standard port number for HTTP traffic is 80 and the standard port number for HTTPS traffic is 443 but it is possible to put a web server on any port number.
Why would we want to move a web site onto a non-standard port number? One common use is for testing where you could keep your regular website on port 80/443 and put a new testing site on a non-standard port number such as 40000. Using non-standard ports is not actually very common on a general purpose web server such as Apache and nginx but it is very common approach to dealing with web applications written using Java, C#, nodejs, etc. These non-standard ports typically live behind a configuration called a reverse proxy (more on this in the chapter on performance).
The binding of a web server to a specific port is called “listening” so look for this type of word in your server’s configuration. In the world of Apache for example you need both a ‘Listen’ directive as well as a virtual host entry that matches the port number.
3.14 Interface Binding
It is not uncommon for very powerful physical servers to have multiple network ports. These multiple ports can be used to connect to different networks or for load balancing to allow more traffic. Sometimes it is useful to have a web server attach to only one particular interface for security or to connect to multiple interfaces and give different web pages to people connecting to the server from different networks.
[image of two computers on the same server showing different web pages]
Even a web server with one network interface can be configured to have multiple IP addresses (called multi-homing) to allow different content based on which IP address the visitor has put into the address bar of the browser.
3.15 Name Binding
It is possible to serve up different web pages using the same IP address and even the same port number. A lot of the free and shared hosting sites on the internet use the name of the website to decide which set of pages should be served up. If you remember from the HTTP section of this course the “Host:” directive is mandatory and it is used for this type of selection.
[ image showing different pages based on name … include the Host directive ]
The name binding approach requires that DNS is configured correctly or else the client is using the /etc/host file in order to guarantee that the browser puts in the correct name/ip into the HTTP request.
3.16 Apache2 Web Server
The Apache2 web server is one of the top two web servers that is used on the internet today second place only to the nginx server which is also described in a later section of this chapter. In this section we will talk about specific configuration options and examples based on the Apache2 web server as install in Ubuntu. Different Linux flavors might keep files in different locations and may or may not have certain utilities for helping but the configuration items will be the same.
3.17 Basic Configuration Approach
Most of the apache configuration files are loosely based on XML. It isn’t entirely XML based but the ideas are similar. You will need to make sure that tags are
The standard configuration file for Apache2 is /etc/apache2/apache2.conf. In past versions all of the configuration information was kept in this file which often turned out to be hundreds of lines long. Some internet sources advise editing this file but generally it is a bad idea and you should be modifying the included files instead to make things more manageable.
If you read through the apache2.conf file ignoring all of the comments (lines that start with #) and looking for the lines that start with Include or IncludeOptional you will see that many of the configuration options are actually kept in the folders /etc/apache2/sites-enabled, /etc/apache2/conf-enabled, and /etc/apache2/mods-enabled.
If you look at the sub-folders of /etc/apache2 you will also see sites-available, mods-available and conf-available. The usual approach in managing apache is to create a file in one of the available folders and then make a symbolic link to that file in the enabled folders.
3.18 Modifying and Reloading the Configuration File
When you modify any configuration file for apache you will need to reload the configuration files in order for the changes to take effect. However before reloading it is very important to run the configuration test:
apachectl configtestThis command will verify the configuration file for basic problems like syntax issues and some missing files referred to in the configuration. Even though it will not catch every possible error, it will help you spot most problems before you end up crashing the web server. If you get things other than ‘Syntax OK’, you need to investigate and fix the problems first.
Once that configuration file has been verified, you can then attempt to reload the configuration file using systemctl reload apache2. If there are no errors then the command should just be silent (i.e. no error messages displayed) then you can proceed with your testing of the new configuration. If you do get an error at this point, you should check the error log file. If you ask your instructor what is wrong, they will ask you what does the error log file say so you might as well open that file first before asking.
3.18.1 ServerName error in default configuration
The first time that you tru running a configtest you will likely end up with the following error:
root@wsmdemo:~# apache2ctl configtest
AH00558: apache2: Could not reliably determine the server's fully qualified domain name, using 192.168.29.100. Set the 'ServerName' directive globally to suppress this message
Syntax OK
Apache uses a ServerName to map incoming requests to the correct VirtualHost (you will see this in a couple of sections below) and at least one ServerName directive is required for the server for situations where your VirtualHost does not contain a ServerName directive. Creating a ServerName directive at the end of the /etc/apache2/apache2.conf file with IP address will be sufficient to remove the warning message. There are many people online suggesting using 127.0.0.1 as the default but then there are people saying that apache will only serve up request from the local machine; because it is not a Listen directive, apache continues to serve requests from any connection. I
3.19 Apache Installation on Ubuntu
The package name is ‘apache2’. Installation is relatively quick with ‘apt install apache2’. Here is a video that I created to show it:
3.20 Virtual Hosts
A virtual host in apache is the configuration directive that allows you to run multiple sites at the same time on the same server. Even if you are using just a single site we still use virtual hosts to make it easy to enable different types of sites at different times.
3.21 Site Configuration Files
Most of the configuration that you perform in apache are configuration changes specific to a single site. This includes changing the document root, the listening directives and the virtual host entries.
When the apache software is first installed in Ubuntu a site called 000-default is initially created. The configuration file is quite large with a lot of comments but removing the comment lines shortens the file to something easier to read.
<VirtualHost *:80>
        ServerAdmin webmaster@localhost
        DocumentRoot /var/www/html
        ErrorLog ${APACHE_LOG_DIR}/error.log
        CustomLog ${APACHE_LOG_DIR}/access.log combined
</VirtualHost>
Here we can see that this virtual host has been bound to all IP addresses (the * in the VirtualHost entry) but only on port 80.
The email address of the person responsible for the server is webmaster@localhost. This email address shows up in some types of basic error pages. The idea is that if a website is malfunctioning you could send and email address to the person responsible and have them fix something. To be honest, most people do not put their actual email address here because of spam.
The DocumentRoot directive is the location of the files that will be handed out to visitors going to your site. Although it is possible for you to change this directory to anywhere on the Linux system there are some security settings in the main apache2.conf file which restrict this to be only in the folder /var/www so it is easiest to leave your documents sub-folders of this main folder.
The ErrorLog file shows that the file will be called error.log and it will be located in the ${APACHE_LOG_DIR} folder which is typically /var/log/apache2. Like everything else in apache the location is configurable but I would recommend leaving the ${APACHE_LOG_DIR} variable alone. Changing the name of the error log file can be helpful when you are hosting multiple sites and you want messages for each site going to different files.
The CustomLog is the access log. This file keeps a record of every visitor coming to your website. The format of what goes into the log file is highly customizable and how to configure logging in Apache requires a full section. However even if you leave the standard configuration file format, changing the name so that each virtual host has a different log file will make troubleshooting and monitoring of your site easier.
I would highly recommend keeping only a single VirtualHost directive inside each configuration file unless you have a situation where multiple sites are common. One such example is having a single configuration file for the HTTP and the HTTPS for a web site since the HTTP likely only contains a basic redirect for the entire website.
3.21.1 Site Activation/Deactivation
The actual site configuration files (as opposed to the symbolic links) should be placed into the /etc/apache2/sites-available folder. To activate a site you should go to the sites-enabled folder and create a symbolic link to the actual configuration file using a command like this
ln -s ../sites-available/mysite.confDisabling a site just requires deleting the symbolic link. Remember that to make any site active or disabled, you also need to reload the configuration file for the apache server.
Because the enabling and disabling of sites can happen frequently, Ubuntu deploys two commands called a2ensite and a2dissite which create the correct symbolic link in the correct folder with only providing the name of the configuration file. This can be very helpful when dealing with apache configurations but be forewarned that the nginx package for Ubuntu doesn’t include similar commands so you need to be aware of what these commands actually do.
3.22 Important Apache Directives
The full documentation for all the Apache web server configuration options can be found online, here I present only a small subset that we frequently use in the course for basic apache configuration
3.23 Redirection
Redirecting a client from one URI to a different URI can be done in many ways. One of the simplest ways is to use the Redirect directive whose syntax is
Redirect [status] [URL-Path] URLThe URL-Path is an absolute path that must start with a ‘/’ which refers to a file or folder in your site that will be redirected. The URL is the new location which could be a local path to the same machine or a full URL to a different server. The status could be left blank which will generate a temporary redirect (HTTP code 302) or you can include the word “permanent” which will cause apache to send back the HTTP 301 code instead.
Example
Redirect "/pictures" "https://my.url.com/photos"There is a very flexible RedirectMatch directive which allows you match regular expressions. This can be helpful if you wanted to do something very fancy like redirect all the requests that start with the letter “a” to another location. For example:
RedirectMatch "^\/a" "no_a.html"Regular expressions are extremely powerful but we don’t have the time to talk about them in this course but I encourage you to learn as much as you can because they do appear in other parts of the Apache configuration files as well. The example says to match everything that starts with a “/a” and tell the browser to request the file “no_a.html” instead. One word of caution, if the destination matches the regular expression you will end up with a situation where the new file causes another redirect to the new file! This will be stopped by the browser with a comment like Too many redirects. Debugging redirection problems is easier with our manual web client or the Postman utility.
Although the Redirect directive can be placed outside of a VirtualHost, in fact directly into the apache2.conf file, I wouldn’t recommend it to avoid confusion. Typical redirection is best done on a site-by-site basis.
3.24 Port Binding
In our course we will enable multiple sites on different ports as some of our exercises. To make apache serve up different content based on different port numbers we need two things. We need a Listen directive telling apache to configure a socket on the given port number and then we also need a VirtualHost entry that matches the port number. It is not enough to have just one of these items you need both!
The ports.conf file in the /etc/apache2 folder contains the basic port listen directives for port 80 and 443. Although you could put more Listen directives in this file, I recommend using a slightly different approach.
Suppose you wanted a new site configured on port 12000 serving up content in the /var/www/altsite folder. I would recommend creating a new VirtualHost in a configuration file containing:
Listen 12000
<VirtualHost *:12000>
        ServerAdmin webmaster@localhost
        DocumentRoot /var/www/altsite
        ErrorLog ${APACHE_LOG_DIR}/alt_error.log
        CustomLog ${APACHE_LOG_DIR}/alt_access.log combined
</VirtualHost>
The Listen directive is kept outside of the VirtualHost directive to inform the server that is should configure a TCP socket listening on port 12000. Just because you are listening on port 12000 however you will not get any type of service unless you also have a matching VirtualHost waiting for messages on the same port number.
I find that by keeping the Listen and the corresponding VirtualHost in the same site file, it makes it easy to enable and disable the site and the TCP socket at the same time. If you don’t have a VirtualHost enabled that is using port 12000 then why would you have apache listening on port 12000?
A good tool to help you determine if you site is working correctly is to use the command ss -nat. The ss command is a command that will list all of the current sockets that are currently used by the system. The flag n just uses the numeric port numbers and doesn’t try to convert them into names, the a flag says to list everything including the sockets are just waiting for connections and the t flag shows only the TCP sockets. You can use the command and look for an output showing the port 12000 or whatever other port you are trying to listen on.
3.25 Interface Binding
In the basic configuration file for the ports you will have noticed a line like Listen 80 which will obviously ask the apache server to attach to port 80 but what is not clear is the interface. When you do not include the interface apache will automatically bind to all interfaces.
If for some reason you only wanted to have apache attached to one IP address then you need to modify the ports.conf file to be something like this:
Listen 192.168.20.32:80Of course the IP address has to be an address on one of your TCP/IP interfaces otherwise this will not work. If you have multiple IP addresses on your server and you know that you will only ever be using apache on one of the interfaces then you should probably modify the ports.conf file to specify the interface, otherwise if you plan to have multiple interfaces serving up web content then you should probably just leave the configuration as it is.
3.26 Name Binding
The directive ServerName allows you to configure multiple virtual hosts on the same IP:Port that serve up different content based on the ‘Host’ directive from the browser. The browser will send the name of the host that it is trying to reach based on what is in the address bar. If you try to visit the URL http://redsite.org/somefolder/help.html the host line would be Host: redsite.org. You can easily test things using our manual WebClient tool but for other tools you would need to create a DNS server or modify the hosts file so that names can be resolved to your server’s ip address.
Let’s suppose that each of the following configurations are enabled:
# call this file red.conf
<VirtualHost *:80>
    ServerName redsite.com
    ServerAdmin webmaster@localhost
    DocumentRoot /var/www/site_a
    ErrorLog ${APACHE_LOG_DIR}/error.log
    CustomLog ${APACHE_LOG_DIR}/access.log combined
</VirtualHost>

# call this file blue.conf
<VirtualHost *:80>
    ServerName bluesite.com
    ServerAdmin webmaster@localhost
    DocumentRoot /var/www/site_b
    ErrorLog ${APACHE_LOG_DIR}/error.log
    CustomLog ${APACHE_LOG_DIR}/access.log combined
</VirtualHost>

# call this file 000-default.conf
<VirtualHost *:80>
    ServerAdmin webmaster@localhost
    DocumentRoot /var/www/html
    ErrorLog ${APACHE_LOG_DIR}/error.log
    CustomLog ${APACHE_LOG_DIR}/access.log combined
</VirtualHost>
If a request comes in for redsite.com or bluesite.com then Apache will match the request up with the appropriate virtual host. If any other name comes in and nothing matches then 000-default will be used.
Normally what I do for 000-default site is to do a redirect to somewhere normal such as google or another website that I manage. Many shared hosting providers will do a redirect from 000-default to their main commercial page selling their shared hosting services.
The configurations above actually could use some improvements. Each of the current hosts are sending all access and error log messages to the same file. Although this is valid, it makes debugging individual sites a real challenge. I would recommend that we rewrite these as red_access.log, red_error.log, etc.
3.27 Basic Authentication
Basic authentication requires a file that contains usernames and passwords (called the password file). The format of this file is a separate line for each user in the form username:password but the password is kept in a salted MD5 hashed format.
To create the file the utility htpasswd can be run with the ‘-c’ option the first time. The file will be created in the current directory so you will want to move to the destination folder before running the command. If you want to add new users to the file then you can omit the ‘-c’ option. Removing users from the password file can be done using the ‘-D’ option or you could just remove the line using any text editor. Likewise you can always view the contents of the password file using cat or a text editor to see the list of users.
You should never put the password file in any folder that can be served up by the web server. Even though the passwords are kept in a hash format, the MD5 hash can be quickly reversed with a fast computer.
Once the password file has been generated, you may now configuration basic authentication in apache.
<VirtualHost *:80>
    ServerAdmin webmaster@localhost
    DocumentRoot /var/www/somesite
    ErrorLog ${APACHE_LOG_DIR}/error.log
    CustomLog ${APACHE_LOG_DIR}/access.log combined
    <Directory "/var/www/somesite/topsecret">
        AuthType Basic
        AuthName "Restricted Area"
        AuthBasicProvider file
        AuthUserFile "/etc/apache2/users/somesite.users"
        Require valid-user
    </Directory>
</VirtualHost>
In the configuration file you will see a directive called Directory in which there are some authentication restrictions. The AuthType Basic indicates that we will be using the basic authentication module. There is a second type of authentication called Digest Authentication but it doesn’t help with security and the apache recommendation is to use basic authentication combined with an HTTPS connection.
The AuthName directive specifies the name of the site that some browsers may show to the user to let them know which section they are entering. Most browsers ignore this and just provide a plain username/password box.
The AuthUserFile directive indicates which password file will be used for the authentication. This is the file that was created and maintained by the htpasswd command. The Require directive indicates the type of authentication that will be needed in order to serve up the files. The example provided allows any user/password in the password file but it is also possible to list specific users.
3.28 Allow Override Dream and Nightmare
Normally apache uses the configuration files in the /etc/apache2 folder but it is possible to configure apache to use configuration files kept in the /var/www/ folder through the use of the AllowOverride all directive. For shared hosting when you have many customers using the same server and they need their own customization (such as redirection, authentication, etc) then you have no choice but to enable this option but otherwise it should never be used on a server that you maintain for your own purposes. If you find somebody online suggesting to add the directive and then create .htaccess files, you should stay clear of those sites while you are taking this course!
The problem with the AllowOverride directive is that when enabled, apache must look at each request and then examine each folder in a path to see if there is an .htaccess file and apply the configuration rules. This scanning takes a lot of time and I’ve read on some sites that the performance of apache is half when using .htaccess files.
Can you use it? Well it does work and when doing development on a local machine (using tools like WAMP, MAMP, etc) it is completely fine to use the .htaccess files but when deploying an application to a production server I would recommend taking the configuration items from the .htaccess file and putting them directly into the VirtualHost entries.
3.29 Default DocumentRoot
One thing that you might be tempted to try is to disable all sites to see what gets served up when you have it all switched off. You might expect that nothing shows or some kind of page showing and error is displayed to the user but instead it will show you whatever is inside of /var/www/html if you are using Ubuntu. The apache2 server for Ubuntu is compiled with a default setting for DocumentRoot to the /var/www/html folder so if you do not add anything to a configuration file about the DocumentRoot it will simply use the one supplied.
If you are using different Linux distributions be warned that this default could be a different location. The official Apache document says “/usr/local/apache/htdocs” Apache DefaultDocument
3.30 Troubleshooting
Most problems in apache configuration files come from spelling mistakes and forgetting to actually reload the configuration file. Diagnosing a problem requires several tools:
1. Use apachectl configtest to see if there were syntax issues in the configuration file.
2. Use systemctl status apache2 and see if it is running.
3. Use ss -nat to see if something is listening on the ports you are expecting to be in use.
4. Look at the /var/log/apache2 file (maybe it is different!) for errors
5. Check the /etc/apache2/sites-enabled folder to see if the site you are trying to view is actually enabled.
6. Make sure that you have actually reloaded the configuration file with systemctl reload apache2.
There are no magic formulas for tracking down problems. The most important tool is your eyes and your head, if there are problems they will usually show up in the error log file. You need to get use to viewing the log file all the time when things work so that when something fails the problem stands out.
[ need graphic of trouble shooting ]
#@ nginx The nginx web server software has gained significant increases in deployments during the past X years to become the most popular server in use today. The main reason for is popularity is the significant performance increases versus apache for static content.
In several cases I will compare the configuration of nginx to apache so it is best if you have read through the apache section of this chapter before reading this section.
3.31 Basic Configuration Approach and Reloading the Files
The main configuration file for nginx is usually found in /etc/nginx/nginx.conf. If you review this file, you will find that it includes several other files such as all the files in /etc/nginx/sites-enabled in the same way that apache uses. The format of the file is not at all like the XML from Apache but somewhat similar to the format used in CSS.
Just like in the world of apache, you will need to ask nginx to reload its configuration file each time that you make a change. The command is systemctl reload nginx.
To check the configuration file syntax for problems before reloading you can use the command nginx -t. If this test produces syntax errors, you will need to fix them first before actually attempting to reload the configuration file. Just like in the world of apache however, just because the configuration file passes the configuration test doesn’t mean that your configuration will do what you want it to do!
3.32 Server Context
A server is similar to a VirtualHost from apache. If you want to serve up different HTML content based on which port is being access or which Host name is being sent you create a new server context.
3.33 Site Configuration Files
The standard approach to configuring multiple sites on an nginx deployment is to put each site configuration into its own file in the /etc/nginx/sites-available and then make a symbolic link in the ‘sites-enabled’ folder to activate it and then erase the symbolic link when you want to disable the site. There are some scripts available online that work similar to the a2ensite but it is probably better to learn how to make symbolic links.
A typical site configuration file looks like this:
server {
        listen 80 default_server;
        listen [::]:80 default_server;

        root /var/www/html;

        index index.html index.htm index.nginx-debian.html;

        server_name _;

        location / {
                try_files $uri $uri/ =404;
        }
}
Like apache, the list of directives is huge and you need to review the online documentation for the full details. This document describes only the items that we will be using in our course and even then we will not describe all of the details and options.
The listen directives tell the server which ports and ip addresses to bind to. There are around 15 options that can be included with this directive so check the documentation for the more advanced options. In the example provided the first directive indicates that we will be listening on port 80. The option default_server tells nginx to be the default server for ths particular port. If your server has multiple IP addresses then you could issue the directive listen 192.168.30.34:80.
The root directive indicates the the document root for the HTML files that will be served up by this particular configuration.
The index directive allows you to define what files wil be served up when the browser asks for a URL that ends with /. The most common configuration is the index.html file but some sites might also chose to include index.htm file as well.
The server_name sets the name of the Host line that will be used to match the configuration file. The use of the _ character means that this server has no name.
Finally the location directive is used to specify different behavior depending on the subfolder specified. We started with a location of ‘/’ which of course means everything. The try_files is a very flexible directive that indicates what the server should attempt to do with an incoming request. The example shown says to first start by requesting the actual resource given and if that doesn’t work, add a / to the end of the URI and if that still doesn’t work then return the error code 404.
3.34 Redirection
Redirection in nginx is accomplished using the the rewrite directive. Unfortunately the rewrite directive is a bit complex and uses regular expressions so learning some basic regular expression syntax is very important plus it allows for some significant flexibility in terms of redirecting some requests.
Let’s consider a situation where we used to have a bunch of images on a website stored in `/var/wwww/mysite/photos’ and you wanted to change the name of the folder to ‘/var/www/mysites/images’ but of course the images have already been crawled by Google and you don’t want visitors ending up with dead links (dead links have serious impacts on your search engine ratings which decide where your site goes when people search for things).
We could configure the site as follows:
server {
        root /var/www/mysite;
        index index.html;
        server_name mysite.test.demo;
        rewrite ^/photos/(.*)$ /pictures/$1 permanent;
        location / {
                try_files $uri $uri/ =404;
        }
}
The ‘rewrite’ of course is the interesting directive this time that requires explanation. There are 3 options handed into the rewrite directive which are:
* The ^/photos/(.*)$ parameter says that we should match any requests that start with the string “/photos/” and have any other characters until the end of the URI. The matching characters then become the first replacement arguments that can be used in the next option.
* The /pictures/$1 directive tells us that the new URL should replace the previous /photos with the word /pictures/ followed by whatever matched the regular expression from before.
* The permanent option is an indication to nginx that you want to send back a 301 code. Using the option rewrite would send back a 302 instead.
So now a request coming into our server for the URL http://mysite.test.demo/photos/cat.jpg would now generate a 301 redirect to http://mysite.test.demo/pictures/cat.jpg. Even if the request was for an image in a sub-folder, this configuration would still continue to work as expected.
3.34.1 Regular Expression
There are too many possibilities in regular expressions to try and cover everything in this book but there are a couple of frequently used items that should be described: * ^: This means the start of the string * $: This means the end of the string * .: Means match any character * (.*): Match any number of any characters
3.35 Interface and Port Binding
We have already seen the ‘listen’ directive in the sample configuration file from before. You do not actually need any listen 80 directive on any site because nginx will automatically use port 80. I would recommend not putting any ‘listen 80’ directive on any server context with the exception of the default. You will need the listen directives for other non-standard port numbers.
3.36 Basic Authentication
To configure basic authentication in nginx we need to create the same password style file that was used in Apache. In fact the official nginx documentation suggests install the apache2-utils package so that you have the htpasswd command to create the file and to assign the passwords.
Once you have the password file created then it is just a matter of putting a location directive inside the server for the folder that you want to protect.
    location /new {
        auth_basic "Secret Area";
        auth_basic_user_file /etc/nginx/test.users;
    }
The string for the auth_basic directive is ignored by most browsers and the auth_basic_user_file is the file containing the username/password pairs. I have seen some examples online of people using relative paths but I would recommend using an absolute path for this directive so that you know for sure which user file is being used.