6 Web Security
I don’t really want to write a chapter about basic cryptography in this book as it is really a topic for another book/course. Unfortunately I need to cover at least some basics in case you have not seen the concepts before. What I present here is far from complete in terms of cryptography but it is enough for the concepts that we will need in this course.
Over the past few years, I started writing up a set of web based tools for teaching web security. This chapter of the book starts by using these tools (links found in the individual sections).
6.1 Need for Security
[ write up a section showing Wireshark capturing the password on HiJack Bank ]
6.2 Cryptography Concepts
Cryptography is the technique where you take a regular message (called the plain-text message) and you perform some mathematical operations on it at the byte level (think of the ASCII values) to make it so that the message is no longer readable; this is called encrypting the message). This message, the cipher-text, is now transmitted over the network. At the receiving end, the person there needs to decrypt the message so that they can read it. If only the person at the receiving end is able to convert the cipher-text back into plain-text then our message is secure.
I will spare you the details here but if you have never seen a basic algorithm such as Ceasar Cipher, you should probably go off to the internet and do a quick review of how it works. This algorithm of course is way too trivial to use for any real-life purpose but it is simple enough to understand how cryptography works.
Most algorithms work by taking both a message and a key that is used to to encrypt the message. When decrypting a message, you also need a key which may be the same key that was used to encrypt the message or a different key.
6.2.1 Ciphers
There are numerous algorithms that exist for encrypting/decrypting data. We will only look at some of the algorithms that are used for web traffic. You probably wouldn’t see much difference between the various types of ciphers so we will pick just a single variant of each cipher type but will mention other popular equivalents that we might see.
6.2.2 Base 64 Encoding
I think that most readers have probably opened up an image or MS Word file using notepad only realize that it looks like a complete scrambled mess. This is because image files and a lot of other data files are kept in binary format and notepad cannot deal with anything except ASCII characters.
Now imagine a system that could only deal with ASCII letters and not arbitrary binary files. If you wanted to use this system to send an image file, you could need to convert the binary data into ASCII letters and send it using the system. At the receiving end, you would have to take this encoded message and turn it back from ASCII into binary.
One technique that is commonly used is called base64 encoding. In this encoding scheme every 6 bits is converted into one of 64 ASCII characters (https://en.wikipedia.org/wiki/Base64) and of course on the decoding side the process is reversed.
What type of system can only deal with ASCII letters? The SMPT protocol used to send email can only send ASCII data. Including attachments like zip files and images appear to be very simple process but in the background the email client is actually converting these attachments into base64 encoded versions of the file.
6.2.3 Symmetric Ciphers
The most common symmetric cipher these days is AES (Advanced Encryption Standard).
A common place where cryptography is really quite visible is when you want to use some sort of cloud based backup system. If you are backing up your personal data to another location outside of your house, you wouldn’t want the data to be just sitting around so that a hacker to breaks in can read your data. You would always want to pick a provider who encrypts your data. If you were to search for any cloud-based backup solution and read about their features, they frequently indicate that their system uses 256-bit AES encryption and that your key is never stored on their servers.
A symmetric key cipher is a cryptography mechanism that uses a key to encrypt the data and the same key to decrypt the data. Keys are actually binary values but most systems give you a convenient way of entering them using a pass phrase which is converted into a binary format for the actual encryption.
The website https://sit.cna-qatar.edu.qa/inft3203_web/sslbot/chattools.php contains a number of tools and you will find an AES Encryption area where messages can be encrypted and decrypted using a passphrase.
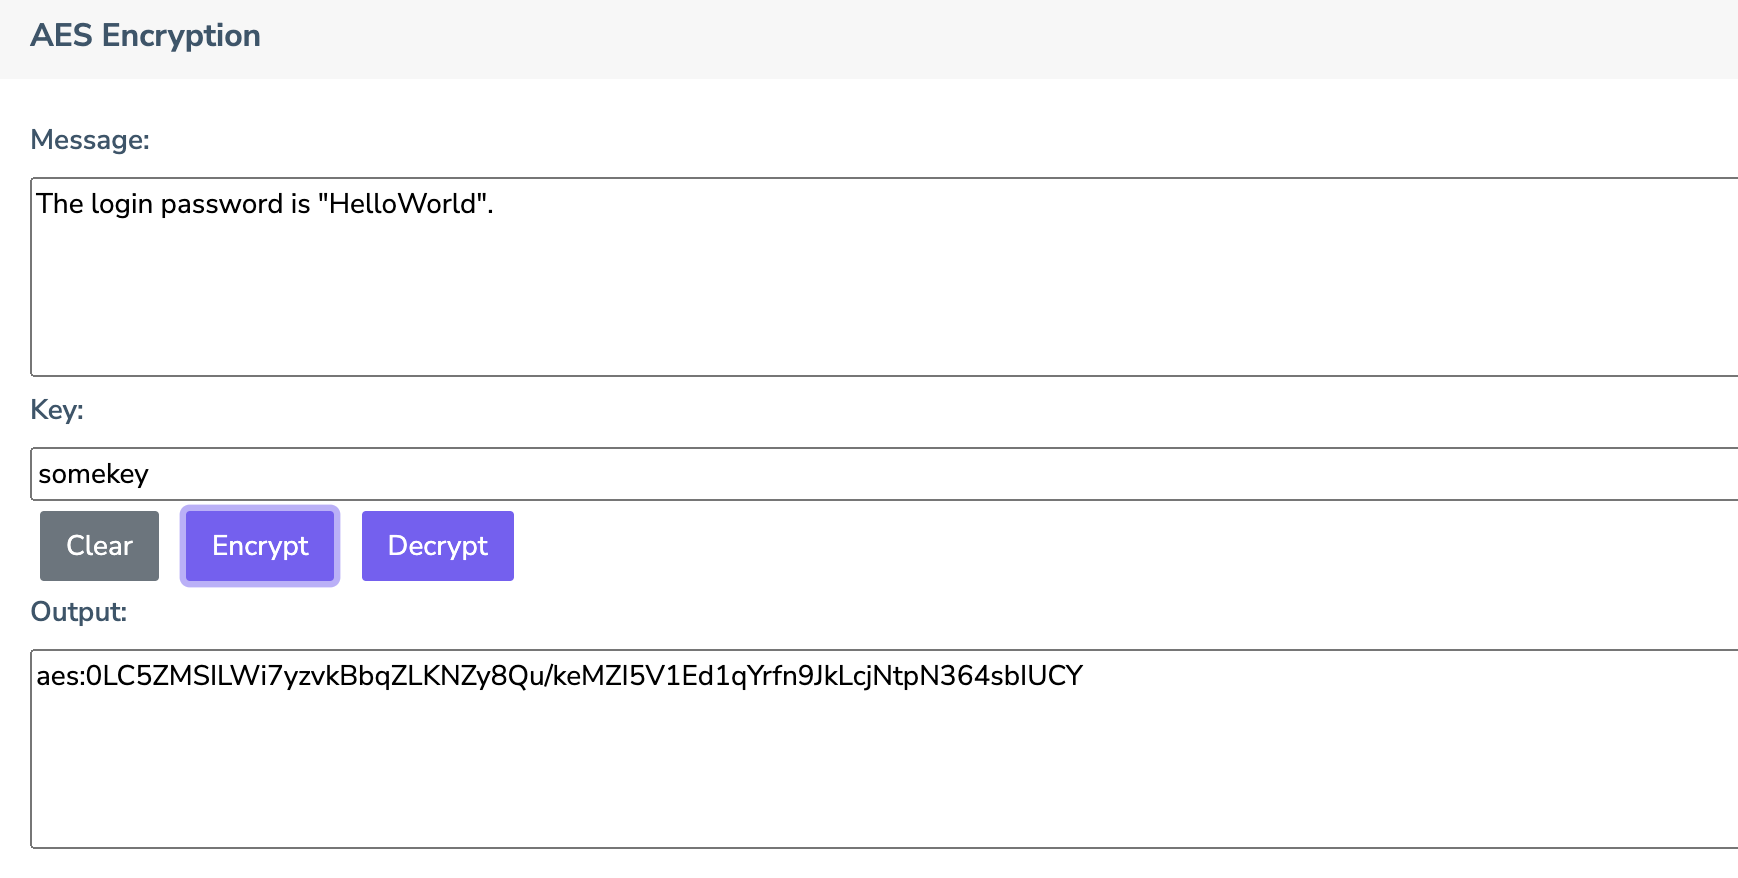
In the example shown, you can see the the user has put in a phrase in the Message box and provided the key “somekey” and pressed the Encrypt button. The result shows up in the Output area. You will notice that the output message starts with “aes”; this is not part of the standard, it is just a convenience indicator so that we (and the system) knows what algorithm was used to produce the data. The rest of the data is the encrypted message stored in base64 format. You could actually try decoding the message using the base64 decoder but you won’t see much!
To decode messages using this tool, you simply paste the output (including the aes: part) into the Message box and hit decode. If you have provided the correct passphrase the message should decrypt back to the original. If you do not put the correct passphrase there are two possible outcomes. The first outcome is that the result may simply say “false” or “could not decrypt”, the second possibility is that you will get a message that is still scrambled. If I wanted to be able to know if the passphrase was correct then I would have needed to include some sort of hash key along with the message and I didn’t want to do this.
Something to note about the passphrase. If you try really long keys, you will find that only the first 32 characters are considered. The first 32 characters of course are 8-bits each giving a total of 256-bits. The algorithm used in the tool is actually a 256-bit AES encryption algorithm whcih explains why it ignores phrases longer than 32 characters.
You can practice sending and receiving AES encrypted messages using the Chat Bot at https://sit.cna-qatar.edu.qa/inft3203_web/sslbot/?type=aes.
In the tools area, you will also find an encryption algorithm called RC4. I included this in the list of ciphers so that we had a couple of options to choose from when we cover the section on TLS. I also picked this algorithm because it is somewhat easy to break short passphrases and I used to include a bruteforce demonstration in class. The RC4 algorithm was used in WiFi routers going by the name of WEP (wired equivalent privacy) but because some vulnerabilites were detect it has been essentially replaced by WPA and its variations.
6.2.4 Asymmetric Ciphers
One significant problem with symmetric ciphers is that both parties need to know the key in order to communicate and the key needs to remain private so that their conversation remains secure. This means that if you wanted to exchange a set of messages using AES encryption, you need to somehow get the key to the other person in a way that nobody else sees it. This is possible if you can meet in person but if you are physically away from the receiver this might not be practical or even possible.
Besides the symmetric ciphers (same key), there are a few different algorithms that fall into the category of aymmetric ciphers where two keys are used. One key is used to encrypt the message and a second key is used to decrypt the message. While in the symmetric key cipher, you can pick any key value you want, you do not get this flexibility with asymmetric ciphers; in this case both keys needs to be generated at the same time because they have be mathematically related to each other. If you end up misplacing one of the keys, you generally need to regenerate the pair because it is nearly impossible to find the other key if you know one of them.
We will be talking here about the RSA encryption algorithm. In this algorithm we generate two keys and call one of the keys the private key and the other the public key. Any messages encrypted with the public key can be decrypted with the private key and any message encrypted with the private key can be decrypted using the public key; this is an important fact that we will need to consider when we talk about digital signatures.
Let’s take an example based on the tools found on my website. The area called “RSA Key Generator” allows you to generate a pair of keys, here is one example:
-----BEGIN PUBLIC KEY-----
MIGfMA0GCSqGSIb3DQEBAQUAA4GNADCBiQKBgQDD5BQLHF7V/ZMAxqeMgePfjAWn
BZ+JwOxgua5NMs0uYdOmzJXHiT+X3YuXyiRlMqBvw53f3q6ZxRJA8UYnvvCQb2dM
JvlyYm0muzIhaTa07ZEVHEUjvTpEganUKgnp0wE8hkhyMs+ehmAr7qQFiwpF57Vq
NJPWaeA/ZVOQ95gEawIDAQAB
-----END PUBLIC KEY-----
and
-----BEGIN RSA PRIVATE KEY-----
MIICXgIBAAKBgQDD5BQLHF7V/ZMAxqeMgePfjAWnBZ+JwOxgua5NMs0uYdOmzJXH
iT+X3YuXyiRlMqBvw53f3q6ZxRJA8UYnvvCQb2dMJvlyYm0muzIhaTa07ZEVHEUj
vTpEganUKgnp0wE8hkhyMs+ehmAr7qQFiwpF57VqNJPWaeA/ZVOQ95gEawIDAQAB
AoGAWgwIIqth9OBhqOOotXAn/eTx3Ds7gSlL/5KbSyVlKEMT9gLpfxXaQ8c1mgrz
/AjvszCq6/QDMvBiWbQPWcnt7slB4PGMqokClVCoLH3y4KXmUolDME1k/SbSm4Pb
pWb3MjLuEywwzuMxeSzki8O2VZC+CTG53TXXDk0dRt+tXrECQQDigl92PC6C+Qm6
AM/sLtiGxlKPXxA2Uv2mwz5NsF+pOCSsTJwihxdalp4x3Bc4jmivtgrF/ZldnmG/
B+iSrazHAkEA3WUvsM+EcNJdzBHZq6vPNOK4OIT8ZDR/rANFQ+AL83an+G/ctN2n
CYWRwx9iEyzxtLZcj9IWgU0zUkZA3ihfPQJBANh51RZAygruS7dyk0ScOOAFpl3T
csEYa8b3DhJdn+8v8wygYxA0n8M585KfT6oDoFVd28oBZpOsjKpvunyEc30CQQCF
zXmdKk2owfreMouTLSr1k3Ay+GxxQylGFFPwSZ/vbG7nvvNse+lP3+HQQ09Kt4b8
6JnYcegYDUhPGRZrLYshAkEAkgrZNgJcQIMXMwazPC8Acew0XhsSY4GqXdx8mywL
Ay7Rdgcp9rXJL1dGdkRJOyM3tQ25IWlEpjS8IKdU7SmHUw==
-----END RSA PRIVATE KEY-----
It is pretty easy to tell which key is which as they are clearly marked by the first line. I used this format for my simulation because this format is used in the actual certificates that we will see later in the chapter. The keys themselves are binary values but this format provides them in a base64 form.
We will try encrypting and decrypting the message using the keys above. I have purposely left the keys as a text so they can be copied if you want to try to recreate the same example. We can encrypt a message using the public key and then see that it decrypts using the private key as shown below: [insert several images showing the cipher working]
As mentioned before, we could also use the private key to encrypt the message and the public key to decrypt the message. You can try this as well to see that it works.
So which way should we follow? This requires that we think of a conversation.
6.2.4.1 Typical Conversation using RSA
If you have read through any text on cryptography, you know that there are two fictitious characters called Bob and Alice so it is time to introduce them. There are actually a large number of fictitious people that can be found at https://en.wikipedia.org/wiki/Alice_and_Bob but we will only bring in one additional person named Carol who is a fictitious third person from whom Alice and Bob are trying to keep their conversation private from.The usual joke in class is that Bob loves Alice, Alice loves Bob and Carol is also in love with Bob (yes this sounds like a plot of a typical TV serial). Bob and Alice of course are trying to keep their conversation private and Carol is nosy and would like to know what is happening or possibly even bring some harm to Alice.
Suppose that Bob wants to send a private message to Alice but also wants to use RSA encryption to protect the conversation. The first step is that Alice would need to generate both a public key and a private key. Alice would keep her private key to herself but could send the public key to Bob using any mechanism including posting on social media! Bob would take the message and encrypt it using Alice’s public key then he could even post the encrypted message back on social media if he wanted to. The only person who could decrypt the message is the person who holds the private key. So as long as the private key remains a secret to the individual who created the key pair then our conversation remains private.
Often when I get students to try and have a conversation between themselves using RSA keys there is almost alwasy at least one student who gets these mixed up thinking that they need the recipients private key to encrypt the message! This of course is not valid, you want the public key to encrypt so that the person with the other key (the private key) can decrypt the message.
To make things a bit more challenging, you need to remember that if Alice wants to send back a message to Bob, it means that she will need to know Bob’s public key.
[ images of bob sending message and alice decoding it]
6.2.5 Other Asymmetric Ciphers
RSA is not the only asymmetric cipher that exists. There is a class of algorithms called Elliptical Curve algorithms which are also used in public key cryptography systems. In fact, you are more likely to see the letters ED than RSA on most websites.
6.2.6 TLS Type Handshakes
I generally have students trying to use both symmetric and asymmetric ciphers and then ask the question which is easier. Most of the time students will say it is symmetric keys because there is only one key to deal with. Computers of course don’t care how many things they have to juggle but they would agree that the mathematics behind an algorithm like AES is much faster to compute than RSA.
The transport layer security (TLS) protocol is a combination of both asymmetric and symmetric ciphers. If we think back to the reason why we had to give up on symmetric key ciphers like AES is that we couldn’t get the key to the other person. So why not use the RSA mechanism to exchange the AES key and then switch algorithms. This approach is exactly how TLS works. You can read about the official handshake from here https://en.wikipedia.org/wiki/Transport_Layer_Security but we will create a simplified version so that it is easier to understand.
The first step is that the person wanting to initiate the conversation sends a plain text message to the other person. The other person would send back their public key along with a list of symmetric algorithms that they could support. The first person would then pick a random symmetric key and encrypt it using the public key they received and send that key along with the algorithm. Finally the other person would now have the key and the conversaion would switch from the asymetric cipher to the symmetric cipher.
Let’s see how this could work for Bob wanting to send Alice a secret message: 1. Bob sends a plain text message to Alice such as “Hey, I want to have a private conversation with you. Please send me your public key”. 2. Alice sends back a plain text message to Bob with “Okay, I can use RC4 or AES, here is my RSA public key”. 3. Bob picks a random passphrase like WYTttre4 and encrpyts the message “Use AES with the key WYTttre4” using Alice’s public key. 4. Alice sends back a message encrypted using AES with key WYTttre4 to Bob with the phrase: “I am ready”. 5. Conversation carries on using AES encryption.
The first two messages are sent in plain text meaning that everybody can see them. It is okay because there is nothing secret about the messages with the exception that other people know that Bob and Alice would like to have a private conversation. The public key sent back in step 2 is okay because it is the public key and only Alice would actually be able to decrypt any messages that were encrypted with the public key. The generation of the random key is helpful because if you always use the same key over and over, there is a chance that somebody might figure it out. It gets transmitted in an encrypted format and the only person who can decrypt it is Alice because she is the only person with the private key. Finally, the message at step 4 is encrypted using a key that only Bob and Alice know.
The number of steps that involve RSA is just step 2 and 3. Therefore we have reduced the number of times that we need to use the slow algorithm to just a couple of times while the rest of the conversation, which could be hundreds of messages back and forth, carry on with the faster AES encryption.
The TLS handshake is a bit more complex where the symmetric key is formed by both parties but the idea is basically the same. If you take a look at any web page and right click on the body and select Inspect from the browser, you should be able to find a security tab where will will tell you how a particular site has been secured. Take for example stackoverflow.com
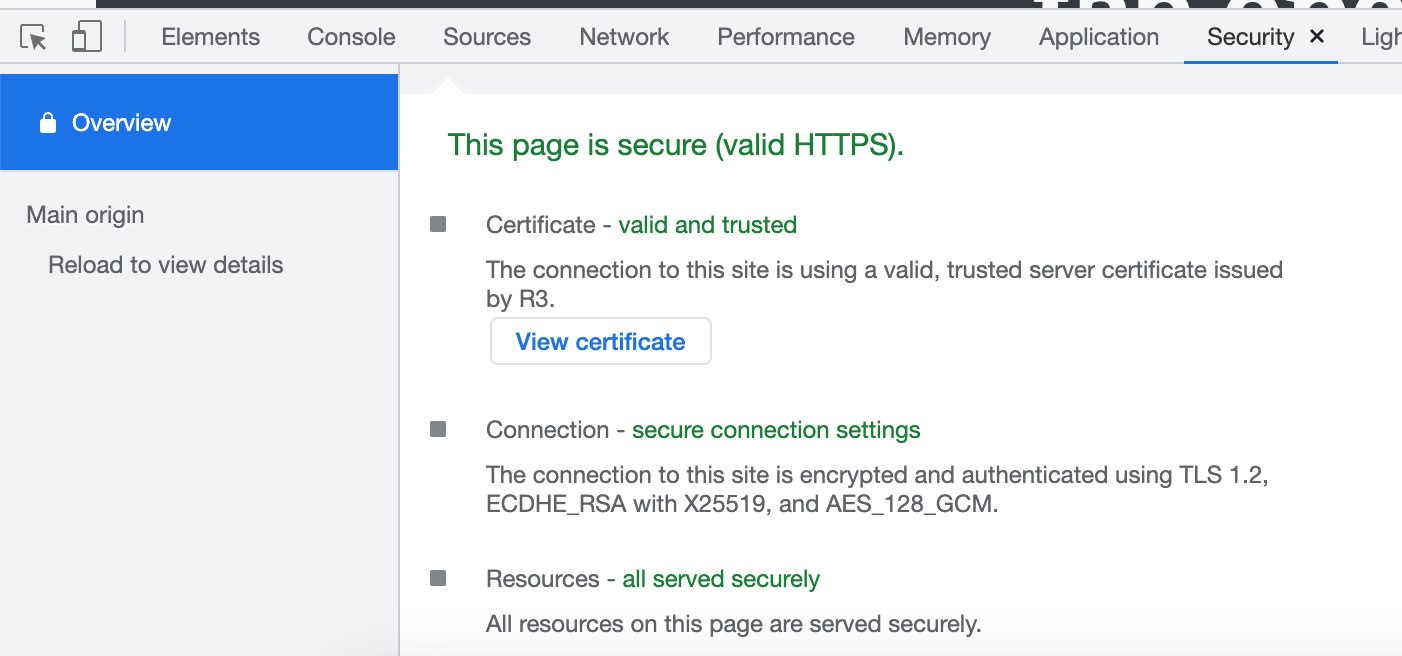
In this case it says that the connection was done using TSL version 1.2. The algorithm AES_128_GCM is used to encrypt the data and the ECDHE_RSA with X25519 algorithm was used to exchange the key. The AES algorithm is only using a 128-bit key but it is using the Galois/Counter Mode. The key exchange is an enhanced version of the RSA algorithm.
If you try different severs, you will find that each server uses a different combination of symmetric and asymmetric ciphers to configure the secure communication. Some servers run older copies of the apache server that might not support newer algorithms and some people’s web browsers might also be old and might only support old ciphers. If you can find a copy of Windows 95 and an old copy of Internet Explorer, you might find that the browser refuses to connect to certain servers just because the browser’s supported cipher list might not match what the server is capable of. The configuration of the list of supported ciphers is something that we will look at in the Apache configuration section.
6.2.7 Cryptographic Hash Functions
A cryptographic hash function is a function that maps a string of data into a single value. Let’s start with a very silly function that does a mapping but not a very useful function!
def hash1(s):
   return len(s)
This function converts a string such as “This is a string” into the value 16. That is all that a hash function does, it turns a long string into something much smaller. Note that given the value 16, you can’t actually tell what the original string is. This type of algorithm could be used to detect changes to a string. For example suppose we know that a string was supposed to be the number 16 but when you calculate the hash you get 18, you can easily conclude that the string has been changed. The problem of course is that there are many other strings that are also the same length so we can’t really use this.
Let’s change the function:
def hash2(s):
    result = 0
    for c in s:
        result += ord(c)
    return result
This time we are not looking at the length of the string but instead we are turning each letter into its ASCII value and adding everything up. This is a bit more useful because we are able to see that the string “This is a string” and “This is a letter” will end up becoming two very different numbers.
This function only looks at the values of the letters but we would like to also look at the positions as well. This is where a group of cryptographic hash functions called secure hash functions come in. We will only look at a single function here even though it is somewhat outdated. I used it in the demonstrations because the size of the resulting hash is small so it is easier for us to look at.
The SHA1 algorithm takes a block of data and reduces it to a 20-byte (160-bit) value which is usually written as 40 hexadecimal characters. There are many calculators on line that will convert strings or files into these values. The python function hash2 (which of course might be different now) produced the SHA1 value of 5ee2e6cbd4a5b3040875f4fc54cf9fa140f0fa19. We could use the hash value as a quick way to determine if somebody has changed the function. Some instructors run SHA1 hash checks agains document submissions to the D2L dropbox looking for two documents that were identical, so you might want to think twice about submitting the exact same document as your friend.
Usually any small change to the input will result in a different SHA1 message. I encourage you to copy the python function into the SHA1 calculator and then make just a tiny change to see how the hash changes.
6.2.8 Digital Sigantures
The final piece of the puzzle that we need to consider is that perhaps Carol is more active in deception than just wanting to be nosy about what Alice and Bob are talking out. Suppose that Alice receives a message from somebody who claims to be Bob in the middle of the night with the instructions “Meet me in the dark alley behind the supermarket and come alone!”. Even if this message was encrypted, there is no way for Alice to actually know if it was Bob who sent it or if it happens to be Carol who will be waiting for her. The problem on the internet is that you have no idea who is actually sending messages.
Outside of the internet we can prove who we are physicall by using a passport. The passport is issued to you by some government office from your country and your document will be trusted by staff at the airport of other countries who trust the country who issued your passport. In our example we will create a new person called “The Authority” who is responsible for verifying who you are and issuing items that prove you are who you say you are.
To get a passport, you generally need to prove who you are, fill out a form and pay some money. Then the passport will be issued to you for a certain amount of time and it will contain various details about you such as your name, date of birth and a photo. All of this is put into some document which is difficult (but not impossible) to forge.
Unfortunately in the world of digital documents we will never be able to stop duplicates but we want to make sure that the document is never tampered with.
The biggest trouble that we could see using RSA encryption is the following scenario. If Bob sends a message to Alice asking for her public key and we get a response, we don’t know who sent the public key. Maybe it was Alice or maybe it was Carol pretending to be Alice. A message could be encrypted and transmitted to somebody who isn’t Alice. The problem is that we need a way to know that the public key actually belongs to Alice.
First thing we need to solve our problem is a public key and private key for Alice. I am going to use the keys from before:
-----BEGIN PUBLIC KEY-----
MIGfMA0GCSqGSIb3DQEBAQUAA4GNADCBiQKBgQDD5BQLHF7V/ZMAxqeMgePfjAWn
BZ+JwOxgua5NMs0uYdOmzJXHiT+X3YuXyiRlMqBvw53f3q6ZxRJA8UYnvvCQb2dM
JvlyYm0muzIhaTa07ZEVHEUjvTpEganUKgnp0wE8hkhyMs+ehmAr7qQFiwpF57Vq
NJPWaeA/ZVOQ95gEawIDAQAB
-----END PUBLIC KEY-----
and
-----BEGIN RSA PRIVATE KEY-----
MIICXgIBAAKBgQDD5BQLHF7V/ZMAxqeMgePfjAWnBZ+JwOxgua5NMs0uYdOmzJXH
iT+X3YuXyiRlMqBvw53f3q6ZxRJA8UYnvvCQb2dMJvlyYm0muzIhaTa07ZEVHEUj
vTpEganUKgnp0wE8hkhyMs+ehmAr7qQFiwpF57VqNJPWaeA/ZVOQ95gEawIDAQAB
AoGAWgwIIqth9OBhqOOotXAn/eTx3Ds7gSlL/5KbSyVlKEMT9gLpfxXaQ8c1mgrz
/AjvszCq6/QDMvBiWbQPWcnt7slB4PGMqokClVCoLH3y4KXmUolDME1k/SbSm4Pb
pWb3MjLuEywwzuMxeSzki8O2VZC+CTG53TXXDk0dRt+tXrECQQDigl92PC6C+Qm6
AM/sLtiGxlKPXxA2Uv2mwz5NsF+pOCSsTJwihxdalp4x3Bc4jmivtgrF/ZldnmG/
B+iSrazHAkEA3WUvsM+EcNJdzBHZq6vPNOK4OIT8ZDR/rANFQ+AL83an+G/ctN2n
CYWRwx9iEyzxtLZcj9IWgU0zUkZA3ihfPQJBANh51RZAygruS7dyk0ScOOAFpl3T
csEYa8b3DhJdn+8v8wygYxA0n8M585KfT6oDoFVd28oBZpOsjKpvunyEc30CQQCF
zXmdKk2owfreMouTLSr1k3Ay+GxxQylGFFPwSZ/vbG7nvvNse+lP3+HQQ09Kt4b8
6JnYcegYDUhPGRZrLYshAkEAkgrZNgJcQIMXMwazPC8Acew0XhsSY4GqXdx8mywL
Ay7Rdgcp9rXJL1dGdkRJOyM3tQ25IWlEpjS8IKdU7SmHUw==
-----END RSA PRIVATE KEY-----
Next, we need a new person called the authority and they also need a public and private key. Here are two such keys:
-----BEGIN PUBLIC KEY-----
MIGfMA0GCSqGSIb3DQEBAQUAA4GNADCBiQKBgQCsYJNAvMZ8cDmw13GGqRRuN3eQ
wl3D6U+dAVGYikxjDOqnWiHwQcS1vF7b3kgnwsAogRWNmYSLbyO5mPqCaBRoh3MI
46xiIQQCL9XZpqOKKxOQf67AQAmjwK+nZP9zokWHXdlF0GTqs+JsHAEO9DgxdHcZ
8p+03bBp5oQOW2KjCQIDAQAB
-----END PUBLIC KEY-----
-----BEGIN RSA PRIVATE KEY-----
MIICXQIBAAKBgQCsYJNAvMZ8cDmw13GGqRRuN3eQwl3D6U+dAVGYikxjDOqnWiHw
QcS1vF7b3kgnwsAogRWNmYSLbyO5mPqCaBRoh3MI46xiIQQCL9XZpqOKKxOQf67A
QAmjwK+nZP9zokWHXdlF0GTqs+JsHAEO9DgxdHcZ8p+03bBp5oQOW2KjCQIDAQAB
AoGAAbewn+uBmsnPeVicM/hJUNPSqCmXn5UaivjxZDC0lCQTznkSb39oQ1tOIqiz
VVoWahDnMxL9hBomY/oHPPdmhKPs0djsaNc93aiGSALf8Z0WoAJl57ZQQRguiRYD
pjbVR++CqGdoVyIWT+8Xw1ooH+VP57RI65z88JmZTaEcdoECQQDXoktivRrUDcRR
cUNixoqB+vKc9h0wFVXHq0ncU1dJmF38OFldocrud9x65mmGcnOG0x5L8olFq3OV
q8pTDDAxAkEAzKVQOeAU3Viun0x2cuzhdgmuV5TrHIM88bajGdRmpO3wOczdhnbb
Y5/eqXSj5F9mVTdh5fEIWK9EgxA80D2CWQJANM1ZCGSmHScB26+QgK99WzbIEgdy
PkP7LVmUTI9b4HmfChQCThtARgSzyKSDUpjUET/BO3e4hYbmVtAqSwvBAQJBAMKc
Fs3i5ZSVCAKfISkrUUEB9dR93pPPzf4C89nVXgNL7p3Yz3VWxE1aM9GsBUtg2Z0C
PMwBSjGkAyAsKdjSFYkCQQCfJ6HacxDf+uPe6RIEmm+fc79PvD8O76WjD2JNIG2S
bKr+NGYmr+d9OowMTEFCQ1Nnvi26FYKMZ4A6hNoVkJQN
-----END RSA PRIVATE KEY-----
The identification document will be called a certificate. To form the certificate we start with all of the things that go into the certificate that the authority can then sign.
Issued To: Alice
Issued By: The Authority
Issed On: 18-APR-2023
Expires: 17-APR-2024
-----BEGIN PUBLIC KEY-----
MIGfMA0GCSqGSIb3DQEBAQUAA4GNADCBiQKBgQDD5BQLHF7V/ZMAxqeMgePfjAWn
BZ+JwOxgua5NMs0uYdOmzJXHiT+X3YuXyiRlMqBvw53f3q6ZxRJA8UYnvvCQb2dM
JvlyYm0muzIhaTa07ZEVHEUjvTpEganUKgnp0wE8hkhyMs+ehmAr7qQFiwpF57Vq
NJPWaeA/ZVOQ95gEawIDAQAB
-----END PUBLIC KEY-----
Remember that we are trying to prevent Carol from producing a fake public key that Bob might send a message to which is why we have included the public key in the form.
Normally what should happen is that Alice visits the authority office in person and provides some identification document which will be verified by the authority. If they authority decides that it is really Alice then they will take the details above and sign it in a way so that another person could verify that the certificate was original and not somehow modified. This process makes use of the RSA and the SHA1 calculations.
First the authority will compute the SHA1 of all the stuff in the listing we made above. Then they will encrypt the SHA1 result using the authorities private key. This gives us a certificate that looks something like this:
Issued To: Alice
Issued By: The Authority
Issed On: 18-APR-2023
Expires: 17-APR-2024
-----BEGIN PUBLIC KEY-----
MIGfMA0GCSqGSIb3DQEBAQUAA4GNADCBiQKBgQDD5BQLHF7V/ZMAxqeMgePfjAWn
BZ+JwOxgua5NMs0uYdOmzJXHiT+X3YuXyiRlMqBvw53f3q6ZxRJA8UYnvvCQb2dM
JvlyYm0muzIhaTa07ZEVHEUjvTpEganUKgnp0wE8hkhyMs+ehmAr7qQFiwpF57Vq
NJPWaeA/ZVOQ95gEawIDAQAB
-----END PUBLIC KEY-----
Signature: rsa:j8XZDAq45fMBSKU8HWBqRq2l7PRBzLcLoRGud4sRQvewnN1T6b8f93ywNuLu0z8uF+Rdzxg3C9bO8YRN+dylR0v6cYePwmIXvJXxYoq5GCnZ3KVmrSuzaLfTXZbLd+vJzxCF/D4kCI26oCmtZmGL58HKr6o67gXIBUJPIriDrcQ=
When Bob reaches out to Alice and wants to talk with here, Alice will send back her certificate. Bob can verify the certificate by decrypting the signature using the authority’s public key. If it does not decrypt then Bob knows that the certificate is fake. But he doesn’t stop there, he must also compute the SHA1 of the certificate (excluding the signature part) to see if his SHA1 calculation matches that of the decrypted signature. I would suggest that you actually try this using the cryptography tools that I have provided on the web site.
If the SHA1 can be decrypted by the authority’s public key, it means that it must have been encrypted using the authorities private key and the only person who could possibly know the private key is the authority. This of course assumes that
What if we start to try and tamper with the certificate? Let’s see what happens if Alice is sort of cheap and doesn’t want to pay for a new certificate next year and tries to modify the end date.
Issued To: Alice
Issued By: The Authority
Issed On: 18-APR-2023
Expires: 17-APR-2025
-----BEGIN PUBLIC KEY-----
MIGfMA0GCSqGSIb3DQEBAQUAA4GNADCBiQKBgQDD5BQLHF7V/ZMAxqeMgePfjAWn
BZ+JwOxgua5NMs0uYdOmzJXHiT+X3YuXyiRlMqBvw53f3q6ZxRJA8UYnvvCQb2dM
JvlyYm0muzIhaTa07ZEVHEUjvTpEganUKgnp0wE8hkhyMs+ehmAr7qQFiwpF57Vq
NJPWaeA/ZVOQ95gEawIDAQAB
-----END PUBLIC KEY-----
Signature: rsa:j8XZDAq45fMBSKU8HWBqRq2l7PRBzLcLoRGud4sRQvewnN1T6b8f93ywNuLu0z8uF+Rdzxg3C9bO8YRN+dylR0v6cYePwmIXvJXxYoq5GCnZ3KVmrSuzaLfTXZbLd+vJzxCF/D4kCI26oCmtZmGL58HKr6o67gXIBUJPIriDrcQ=
If you try to decrypt the signature using the public key of the authority you will get a hash valu but the resulting decrypted hash value will not match the hash calculation of the certificate details which means that the certificate is not actually valid.
One final item. The information about the authority itself is usually given in the form of a certificate since we need to somehow prove that the public key is the actual key people should be using for verification.
Let’s build a certificate for the authority:
Issued To: The Authority
Issued By: The Authority
Issued On: 18-APR-2023
Expires: 17-APR-2045
-----BEGIN PUBLIC KEY-----
MIGfMA0GCSqGSIb3DQEBAQUAA4GNADCBiQKBgQCsYJNAvMZ8cDmw13GGqRRuN3eQ
wl3D6U+dAVGYikxjDOqnWiHwQcS1vF7b3kgnwsAogRWNmYSLbyO5mPqCaBRoh3MI
46xiIQQCL9XZpqOKKxOQf67AQAmjwK+nZP9zokWHXdlF0GTqs+JsHAEO9DgxdHcZ
8p+03bBp5oQOW2KjCQIDAQAB
-----END PUBLIC KEY-----
Signature: rsa:TSW4GlBAUFH7YGwBGklsFu4vC2+x4ocwBAe6zSQ6r0l+QS+PfJ4+XWm1Z9k4LikJalXZoau/c4sB7Wz4C+m//yfxO1Ayr7DAC+DbD0rsyaEVDyboucXFVKmlYXTGEcMCnWSxVV93HxdFoQKmIwfT+j2Mr7Cbi1Db08vjGFZkckE=
You will notice something a bit strange about this certificate. The certificate is issued to The Authority but it was also issued by The Authority. This is called a self signed certificate and authorities will always have one of these.
6.2.9 Certificate Chains
Although what we have seen about digital certificates is certainly feasible, there are some practical considerations that need to be addressed. If everybody in a certain country needs to visit one specific office to get certificates signed, then that office is going to become extremely busy to the point where everybody is waiting. We would likely want to create additional branch offices to help cut down on the workload of the main office. To do this we just need to create certificates for the branch offices. Let’s create one here:
Issued To: The Authority (Lusail Branch)
Issued By: The Authority
Issued On: 18-APR-2023
Expires: 17-APR-2045
-----BEGIN PUBLIC KEY-----
MIGfMA0GCSqGSIb3DQEBAQUAA4GNADCBiQKBgQC5hLT3KzwRA0JX5zoycnNru6mt
R4erGOguJe88svY1DKpUkdm6X+/WXVV7l3EUHSJGltqnrbn2nRGf9ZrAIyJrDbtV
D2rLjRY5WPtHzFq0nVCAahPQYxpzs2uwWOHNPjbYeTtXxE7e20485YaEKxzV6t0K
3MBDOihkQCKhcJI0+wIDAQAB
-----END PUBLIC KEY-----
Signature: rsa:MzKKW4XbQhmr4V+Il6XLXkxD8Ymzirdy8YHNU+Hs1ZuQviaCVKUCXV9cMEdfBzW7hI3IspUDCGVf4IJgc/dIDl2u7zBO+Gvnxr8Gmf4TLU4BxjbA1aPvhAftywn4Re+7DDCF+1PJsxWSC0eUpm+89WK2MCsoc5j5YRxDS8yqxO8=
Then we could issue Alice’s certificate like this:
Issued To: Alice
Issued By: The Authority (Lusail Branch)
Issed On: 18-APR-2023
Expires: 17-APR-2025
-----BEGIN PUBLIC KEY-----
MIGfMA0GCSqGSIb3DQEBAQUAA4GNADCBiQKBgQDD5BQLHF7V/ZMAxqeMgePfjAWn
BZ+JwOxgua5NMs0uYdOmzJXHiT+X3YuXyiRlMqBvw53f3q6ZxRJA8UYnvvCQb2dM
JvlyYm0muzIhaTa07ZEVHEUjvTpEganUKgnp0wE8hkhyMs+ehmAr7qQFiwpF57Vq
NJPWaeA/ZVOQ95gEawIDAQAB
-----END PUBLIC KEY-----
Signature: rsa:hN3H+90XevJzTV0Oe14+6iXhmwg+t36gKW47Qo54xzWOHHHWfuBpnZJewnNhw9I7dmxvxxzhsVeHDEZk/HOdjKKCNH383ev7DQP35wi4c5BHtX4fZOoegxA1wVe/pnQQoCHqfQHhTg2TMabp4oGJBlR0t+1+nXwUxNNrO9a+E8k=
This is going to cause a bit more work for Bob to know if the certificate is actually valid. He would first have to verify Alice’s certificate by decrypting the signature using the Lusail branch public key (we’ll talk about where this comes from in minute) and verify the decrypted signature against his own computation of the hash. In this case it is correct so Bob knows that the certificate was generated by the Lusail branch certificate. How does Bob know that the Lusail branch certificate is valid? He will need to decrypt the signature using the authority’s public key to see if the decrypt signature matches the certificate. We call the chain Authority -> Authority Lusail Office -> Alice a chain of trust. The Lusail branch office becomes what is called the Intermediate Certificate and the Authority Certificate is called the trusted certificate authority root (CAroot).
How does Bob know which intermediate certificate to use? Normally the person who provided the certificate should also provide the intermediate certificate. This is the way that it works in web servers. If the person responding doesn’t provide this certificate then it is more work for verification. Finally how does Bob know about the Authority certificate? It is best if he goes and get it himself directly from the Authority because he shouldn’t trust any other copy that we given to him, especially from the person who he is trying to contact.
6.3 SSL Certificates
The system and process that I used as a description in the previous section is actually quite similar to what happens in real-life. The difference is the information that goes into the certificate but the verification and issuing of certificates is pretty much the same as my description with Alice, the Authority and the Lusail Branch.
Certificates can be saved in many formats but the most common one is called Privacy-Enhanced Mail (PEM) format. We have actually seen this format already because it is what I used for the public and private keys. It is a binary form that is converted to ASCII using base64 which makes it very easy to copy and paste things like certificates between applications.
6.3.1 Evil Instructor
Let’s visit the page https://inft3203.cna-qatar.edu.qa. If you try going to this site you immediately get a huge red warning saying that there are privacy issues:
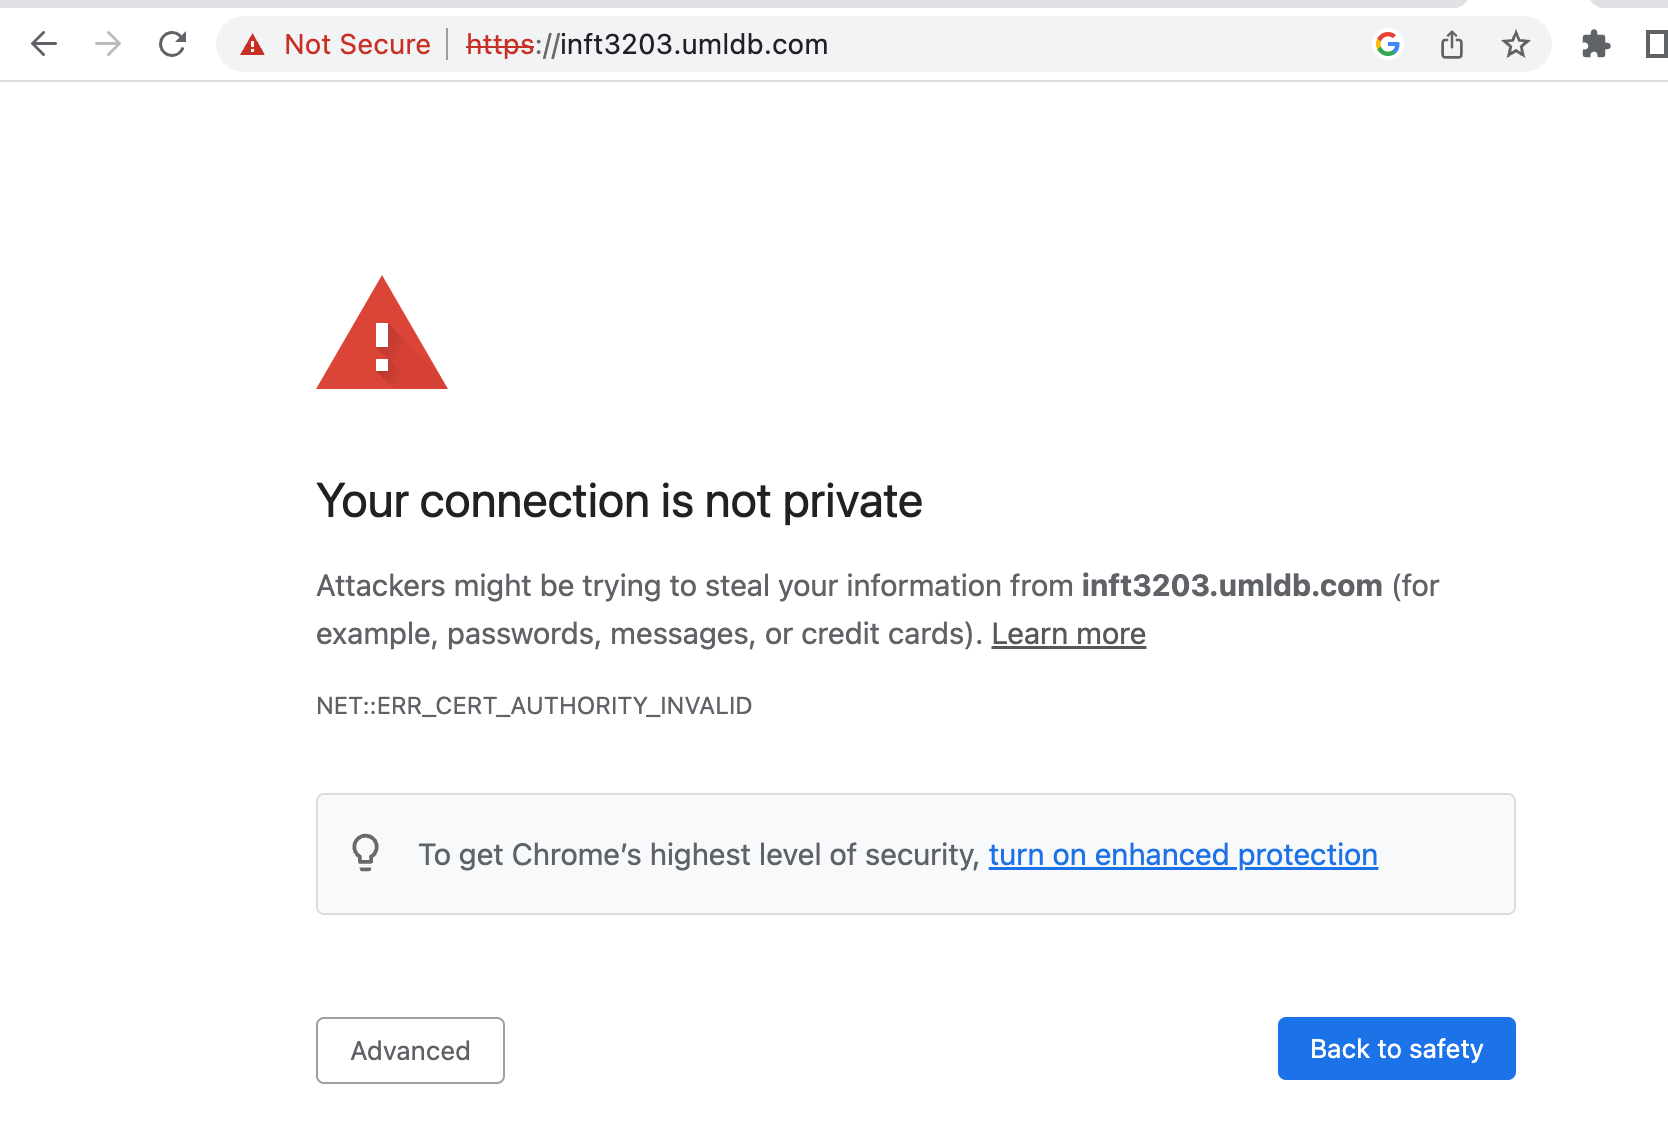
If you right click on the page and bring up the security tab, you will actually find that the connection is protected using TLS. The real issue the person who created the certificate. If you click in the address bar and bring up the information about the certificate you will see this:
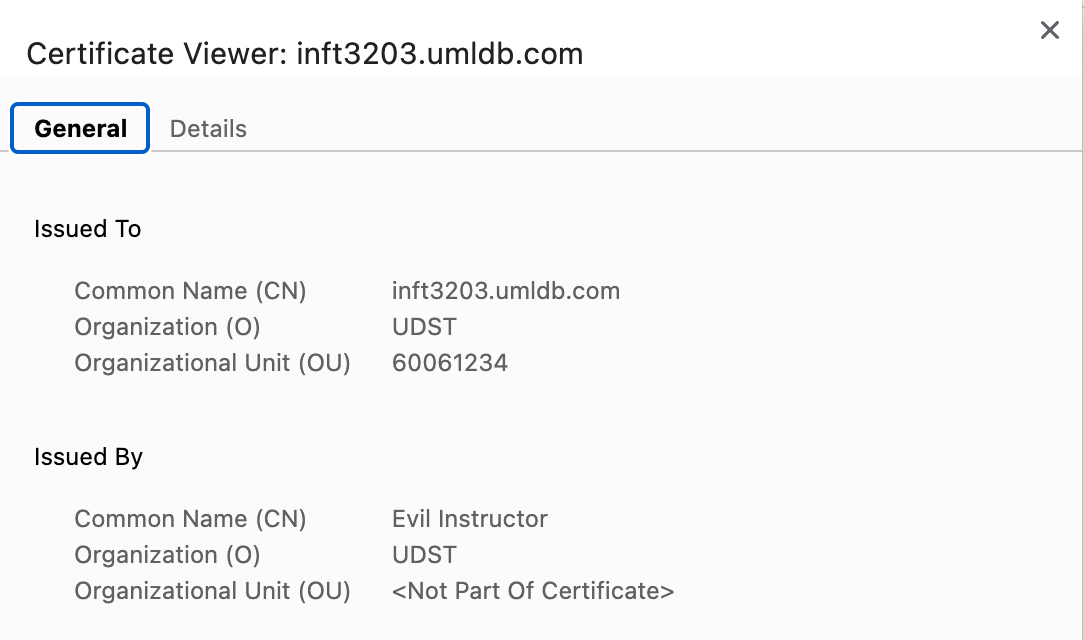
From this we can see that the certificate has been issued to “inft3203.umldb.com” which is fine but it has been issued by somebody called “Evil Instructor” and of course we probably do not trust the Evil Instructor.
As a joke a number of years ago, I started referring to an entity named the “Evil Instructor” who is willing to sign digital certificates for students taking this course. The evil instructor entity at the time actually was partially evil because they would require that students answer time limited skill testing questions about web server management before issuing certificates.
If we really do trust this Evil Instructor we can find the root certificate for them and add it to our local certificate store. A certificate store is a list of root certificates that we trust (or don’t trust depending how it gets saved). If we for a minute go to http://inft3203.umldb.com (the non-secure) site we can see a file called ‘evil_root.crt’. This is the root certificate for the Evil Instructor. Although you probably shouldn’t do this for things that you find on the internet, if you are actually taking this course, you will need to install the root certificate. If you are somebody outside of this course feel free to try installing the certificate but you certainly do not have to; this one site is the only site that I ever sign on the public internet with the certificate.
If you do download the certificate, you will probably get a lot of complaints from your operating system about the dangers involved. Yes, the dangers are real if you start to download and install certificates from people you do not trust.
If you double click on the CRT file on a Mac (which is what I am writing this document on…sorry, I’ll eventually put screenshots for Windows as well) you will find that the computer will open the Keychain tool which is where root certificates are kept but generally it takes a bit of work to actually import correctly. What I do to import this certificate is to right click on “System” and ask to unlock it. Once the system key chain is unlocked, you can now import the .crt file. The imported certificate will be “not trusted” by default but is very easy to make it trusted… I’ll leave this as an exercise how to switch it. Once trusted lets look and see what we have:
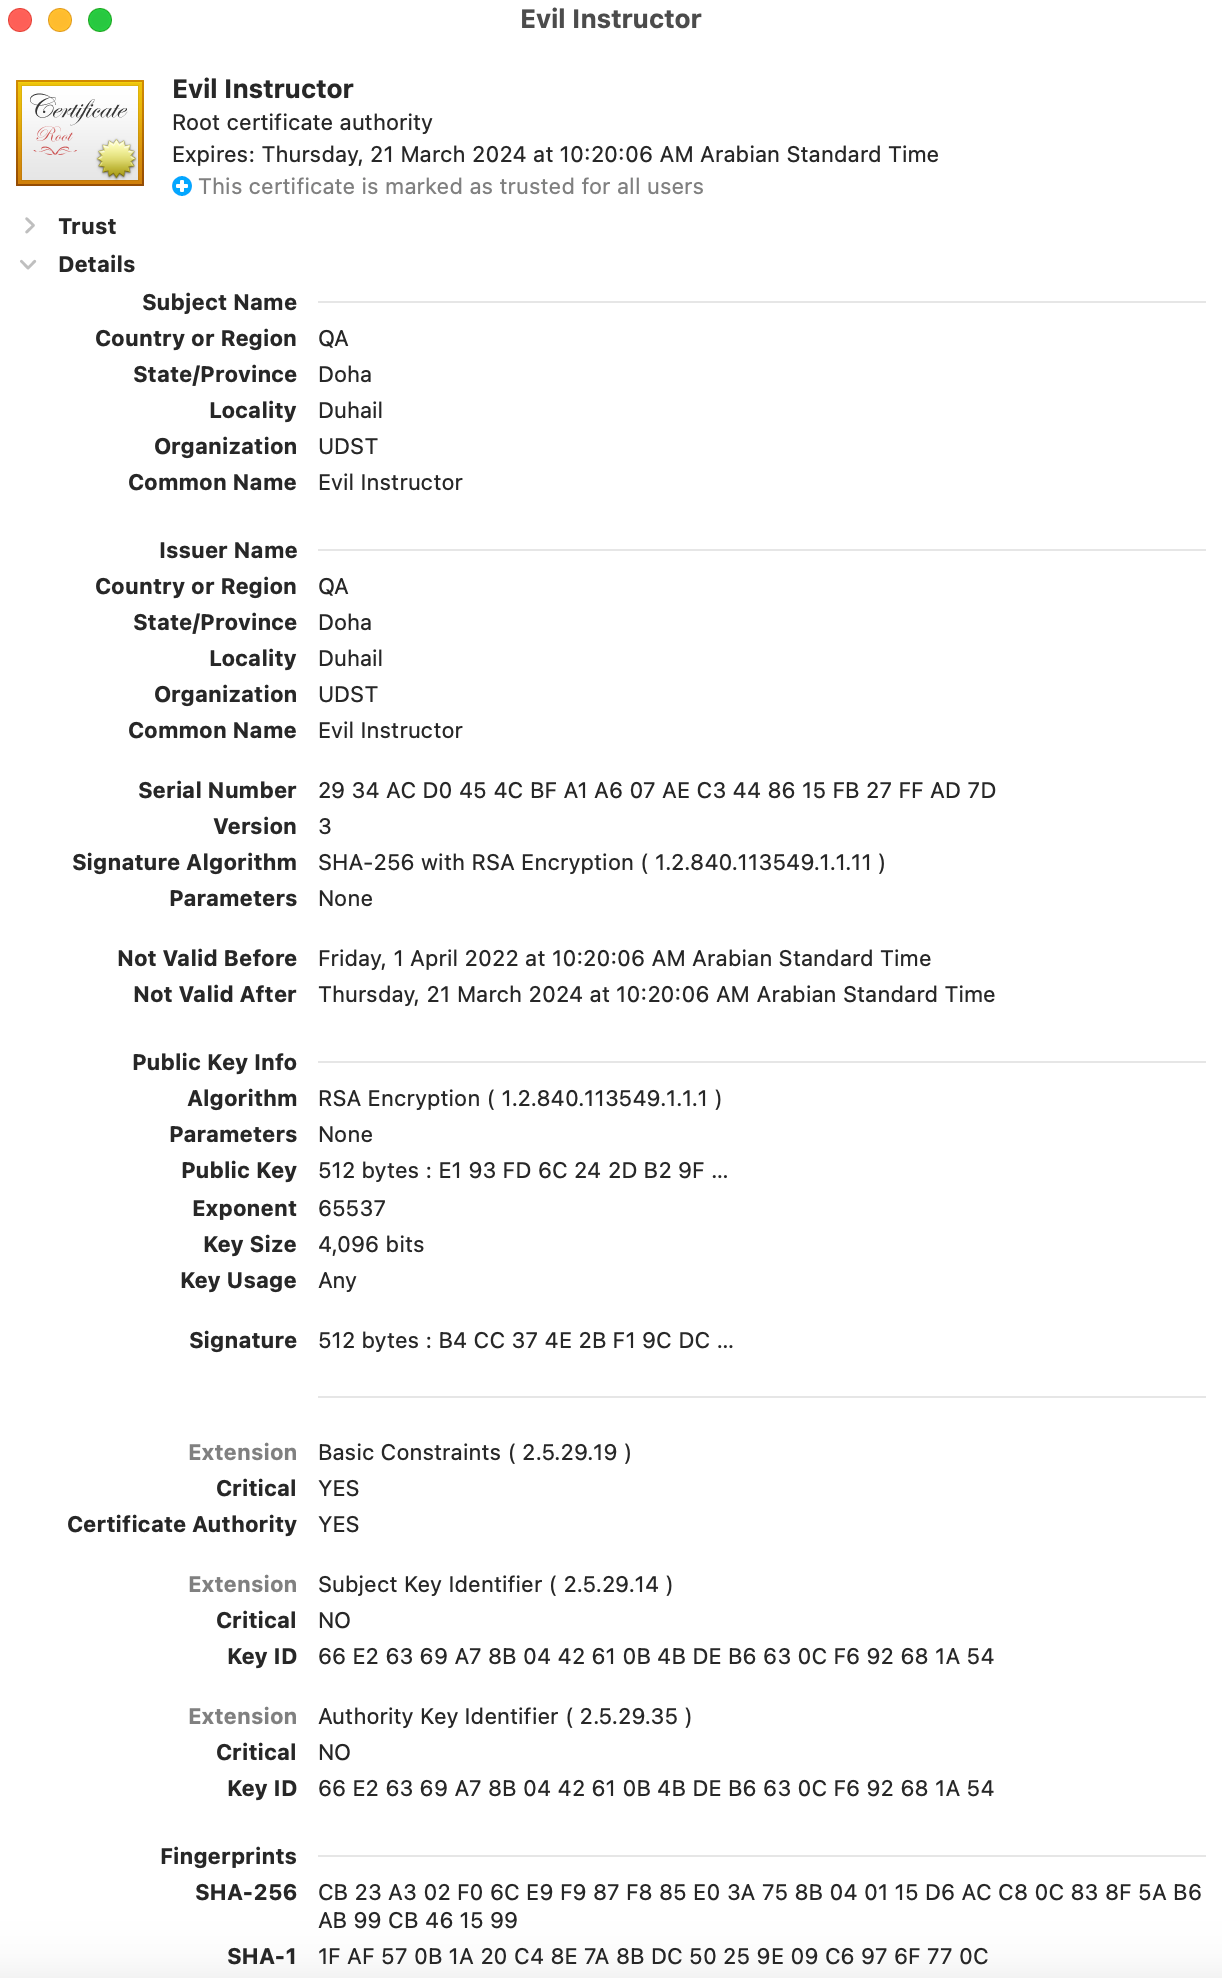
Let’s review what is in this certificate: * The subject name is the details about who the certificate has been issued to. In this case the certificate has been issued to somebody called the “Evil Instructor” (look at the field called Common Name). Most certificates have the name of the site as the CN field but look at the next bullet point. * The Issuer section shows the details about who issued the certificate. The Common Name for the issuer is also the Evil Intructor! This is a self signed certificate. Nobody validated the Evil Instructor except the Evil Instructor themselves! * The next section contains things like the serial numbers (could be important if you were maintaining which certificates were issued to which person) and you can see the signature type which is a SHA256 (which is unlike our SHA1 calculations used before). It also lists when the certificate is valid with both start and end times. * The next section is the public key. Since we don’t cover the mathematics behind RSA, you can ignore what is here but just like the certificates we issued ealier in this chapter, the public key is part of the certificate. * The final sections are called the extensions. There are many that we will not talk about but we will mention the important ones. The one interesting option here is the ‘Certificate Authority’ flag which for this certificate has been marked as YES. This means that the owner of this certificate can use the certificate to issue more certificates!
6.3.2 Certificate Signing Requests
If you try to get a password, you generally need to fill out some form. When you are trying to issue a certificate, you also need to complete a form. The form is actually called a certificate singing request or CSR. This will contain the information about the person who is requesting the certificate and of course their public key. The CSR will of course not contain the “Issued By” field because it is not a certificate! It will also not contain a signature because again it is not a certificate that has been signed. Finally, we never put the private key in CSR; CSRs are sent to the authority for digital signing and putting the private key in something that you show to somebody else makes the private key not longer private!
There are several ways of generating CSRs but we will focus on the use of openssl (a program that is available in Linux) and I will demonstrate the easiest way that I’ve found for creating the CSRs.
The first step is to create a configuration file to make the command easier to run. You do not actually need to create this file and you could instead ask the openssl program to prompt you for each piece of information but I found that by keeping the data in a file is must easier to deal with mistakes because you don’t need to type all the details each time.
We will create a configuration file with the following content:
[req]
default_keyfile=data.key
encrypt_key=no
prompt=no
distinguished_name=dn_section
req_extensions=my_extensions

[dn_section]
C=QA
ST=Qatar
L=Duhail
O=UDST
OU=60061234
CN=Web Book Demonstration

[my_extensions]
basicConstraints=CA:FALSE
subjectAltName=@dns_alt_names

[dns_alt_names]
DNS.1=www.supersuper.com
DNS.1=store.supersuper.com
We will break down each of these lines. Start first with the section names. The [req] section must be there and it must be called req. This section contains a list of directives that will be used when we issue the “openssl req” command later. The names of the other sections are flexible but if you change the name, you will need to change the name in the other parts of the file to match.
In the [req] section I have included an option called ‘default_keyfile’ which indicates which file where the private key will be written when the CSR is created.
The encrypt_key says do not encrypt the private key but leave it as plain text. This sounds counter-intuitive because if we want to protect the private key it sounds like a good idea to encrypt it. In reality an encrypted private key is going to increase the work load on the web server manager considerably because each time that the apache service is started or even reloaded, we are going to be aske for a password to unlock the private key. For a general purpose web server it is probably fine to leave the file unencrypted and simply protect the file so that only the apache service has access to the file.
The prompt indicates that we do not want to be asked for any information while creating the CSR. The final two items distinghuished_name and req_extensions simply point to the other sections contain the information about the CSR.
The [dn_section] contains information that will appear in the certificate about where the certificate was created, who owns the certificate and what is the name. The CN (common name) normally contains the DNS type name that we are deploying the certificate to but it could actually be anything at all which is why I picked the name Web Book Demonstration. In this course most of the information (state, locality, organization) can be anything at all. However to get the evil instructor to sign a certificate, you will need to put in your student ID for the organizational unit (OU) line. If you want to try this, you can use the 60061234 which I use as a demonstration student.
The [my_exentions] section contains a flag saying that the certificate we are requesting is not going to be used for signing other certificates. The evil instructor does check this one.
The subject alternative name (SAN) settings that you see in the final parts of the configuration file has become a requirement since around 2017 when Google decided that the SAN field was to be mandatory for certificates to be accepted by Chrome. This change actually destroyed plans in this course for a semester while I worked out how to deal with the signatures correctly.
Great, we have a configuration file, is this a certificate signing request? The answer is no, this is just a configuration file that helps us build the CSR. Often on open book tests, I will ask students to give me a CSR and they will give me this file instead for which they receive a score of zero. DO NOT FALL VICTIM TO THIS!
To create the actual certificate we need to run a command like this:
openssl req -new -out data.csr -config data.cnfThe data.cnf file is the name of the configuration file. Note that you can create the certificates whereever you want but I will make some suggestions of where they should go when I hit the section on deploying them in the web server.
The command will create a “new” CSR named data.csr using the configuration file data.cnf. The command will output two files, the data.csr as well as the data.key since we mentioned that name in the configuration file. Here are the two files:
-----BEGIN PRIVATE KEY-----
MIIEvAIBADANBgkqhkiG9w0BAQEFAASCBKYwggSiAgEAAoIBAQCHwvVRjeV+Ah9Z
Lcasf3yHpgoGhomhZu1IW0Iz8dV/nAA4h3chY+rwVW0Nxx/a10UEHF6wU+y699zI
... many lines removed
g0FnBaL3Pwg0tgDunnd/gtdydrMKc27q8z/CSRECgYB4eMg3lCjWAk+kLUyLUhR5
wTbg+Ku/cg+8vjySPct32R6vBflp46LE1YG9VRdlozg1a5fYhEaGYsBh6Yeb80Dm
LxFHBwCZaDCnoDGax3ahVdwSuDckDRQARldIS9pjo0oAIGRFWCLS/8acYcE7mVqc
k3H3OgZ8tepphAD5r8rcCA==
-----END PRIVATE KEY-----
which is clearly the private key and
-----BEGIN CERTIFICATE REQUEST-----
MIIDBjCCAe4CAQAwcTELMAkGA1UEBhMCUUExDjAMBgNVBAgMBVFhdGFyMQ8wDQYD
VQQHDAZEdWhhaWwxDTALBgNVBAoMBFVEU1QxETAPBgNVBAsMCDYwMDYxMjM0MR8w
HQYDVQQDDBZXZWIgQm9vayBEZW1vbnN0cmF0aW9uMIIBIjANBgkqhkiG9w0BAQEF
AAOCAQ8AMIIBCgKCAQEAh8L1UY3lfgIfWS3GrH98h6YKBoaJoWbtSFtCM/HVf5wA
OId3IWPq8FVtDccf2tdFBBxesFPsuvfcyBnese/5m3gJ0+AQlZqTBDM342TP2vSB
HMHcgRid9bCf8LDqGX0aNjVPizM8a+cl3f/aH8DR8Pxiw6dT5atGb+1LaslvZ25N
79uxATChC+rKphaovGdsjkNIB+vLaSNOzbwMY7h3Ib1DUflTXMU93FHEEhDuG9af
pJO9IYU/9Soz7H+R7+RUiGuDodCJADk7T9tEiupeWdxR+HY+K0pxEPKXGWrL0MHk
ocY8ys8gPxkuhh8hclsyJMBUY3J9krjcSleTPmVKEQIDAQABoFAwTgYJKoZIhvcN
AQkOMUEwPzAJBgNVHRMEAjAAMDIGA1UdEQQrMCmCEnd3dy5zdXBlcnN1cGVyLmNv
bYITc2hvcC5zdXBlcnN1cGVyLmNvbTANBgkqhkiG9w0BAQsFAAOCAQEAaM3ez33G
xRIsU0UQbz7ZZ57W6jbaYhtLqz0aauOJUZm8j2KpC/nhbeIO9JSh6J18zj6abAIJ
LT0SCjGI5mqVG7n2TtSMUJxoCrfl58cLxqKuSPY6Oq7Jnvjz3dKnAV8TsXAPsWez
TDoD7MaoURhbEOEk9fLnbO1yCrneBJaVxFZnaKh//WtITyQpwFt+Qp3hnNRkngCE
PWs7mUVZrHjHNRVUH0wPuAdiMupVGU1+JmVaf4OEI87DVayfx+lg40ORbRFAX+xd
NDnFB0FjAIVffhGIlGC4FQ2wcdmyY04FYJyHwDtq24vWmtN/c4RlII0J8rZvnvbV
AFfTKhK5cTFFjQ==
-----END CERTIFICATE REQUEST-----
which is the actual certificate request. I’ve left the full CSR available in case you wanted to try to decode it by copying and pasting locally.
To see the contents of the certificate, you can decode this using the command:
openssl req -in data.csr -noout -textwhich produces a listing of everything including the public key and a signature value (which isn’t actually a signed signature yet). Feel free to try showing everything on your own terminal but I usually prefer the following version:
openssl req -in data.csr -noout -text -reqopt no_pubkey,no_sigdumpThis hides the public key and the signature, both of which are not very important here. If we run this on our CSR we get this:
Certificate Request:
    Data:
        Version: 1 (0x0)
        Subject: C = QA, ST = Qatar, L = Duhail, O = UDST, OU = 60061234, CN = Web Book Demonstration
        Attributes:
            Requested Extensions:
                X509v3 Basic Constraints:
                    CA:FALSE
                X509v3 Subject Alternative Name:
                    DNS:www.supersuper.com, DNS:shop.supersuper.com
This is a nice concise view of everything that we have configured in the configuration file and we can verify the options to make sure that we didn’t misspell anything thing.
Why the signature here? The signature is a digital signature where the CSR creator signed the CSR using their private key. The purpose of this has nothing to do with the signature that will appear on the actual certificate later but it just guarantees that somebody hasn’t tampered with the CSR request.
Our next task requires that we get the certificate signed by somebody. Unfortunately not many people in the world will sign out certificate but we can convince the Evil Instructor to sign it by visting the following URL: https://sit.cna-qatar.edu.qa/inft3203_web/certsign/.
We just need to paste the full PEM file into the textbox and click on submit. The only restriction is that the OU must be a valid student loaded into the course (or 60061234). I often see students in lab tests trying to paste private keys and configuration files into this textbox and the page remains evil and doesn’t suggest anything.. what goes there is a CSR!
If we paste our CSR generated from before and the Evil Instructor is happy we get this:
-----BEGIN CERTIFICATE-----
MIIEezCCAmOgAwIBAgIEZD6L8jANBgkqhkiG9w0BAQsFADBWMQswCQYDVQQGEwJR
QTENMAsGA1UECAwERG9oYTEPMA0GA1UEBwwGRHVoYWlsMQ0wCwYDVQQKDARVRFNU
MRgwFgYDVQQDDA9FdmlsIEluc3RydWN0b3IwHhcNMjMwNDE4MTIyNDE4WhcNMjMw
NTE4MTIyNDE4WjBxMQswCQYDVQQGEwJRQTEOMAwGA1UECAwFUWF0YXIxDzANBgNV
BAcMBkR1aGFpbDENMAsGA1UECgwEVURTVDERMA8GA1UECwwINjAwNjEyMzQxHzAd
BgNVBAMMFldlYiBCb29rIERlbW9uc3RyYXRpb24wggEiMA0GCSqGSIb3DQEBAQUA
A4IBDwAwggEKAoIBAQCHwvVRjeV+Ah9ZLcasf3yHpgoGhomhZu1IW0Iz8dV/nAA4
h3chY+rwVW0Nxx/a10UEHF6wU+y699zIGd6x7/mbeAnT4BCVmpMEMzfjZM/a9IEc
wdyBGJ31sJ/wsOoZfRo2NU+LMzxr5yXd/9ofwNHw/GLDp1Plq0Zv7UtqyW9nbk3v
27EBMKEL6sqmFqi8Z2yOQ0gH68tpI07NvAxjuHchvUNR+VNcxT3cUcQSEO4b1p+k
k70hhT/1KjPsf5Hv5FSIa4Oh0IkAOTtP20SK6l5Z3FH4dj4rSnEQ8pcZasvQweSh
xjzKzyA/GS6GHyFyWzIkwFRjcn2SuNxKV5M+ZUoRAgMBAAGjNjA0MDIGA1UdEQQr
MCmCE3Nob3Auc3VwZXJzdXBlci5jb22CEnd3dy5zdXBlcnN1cGVyLmNvbTANBgkq
hkiG9w0BAQsFAAOCAgEAx0TJDnygahO4Iy1n5fHfo7+8/8scSMPykbN7BvSCbhRk
MW6BMsPSwE1zxfArBTv1TAarv6d99CQ6HDQxlkXqMLIyXTg1eZxu51FttWbOmjzN
yylxLLHGOxgXCsU/HWF41hHgW6a4ok0jWDlOf51fFUHaQRnuaxiwrklih+SCqjUG
8wFNEWxIA7s2DXopryQpd49PEebZjKEEU69fCRJ3BbCi/UhYGrDei15bFxacHvXg
ww1KqJNiiy4i9Mnqp0ZGyNibWJCyai75NXQdC1xxdrRpjy+9jvln3gBH8APWsyDT
TaA+AA13xGU9vN7rIUlXnwtaZpCZU6VSiYaV8A+wk3Kd6wA9G7DkE1d7fqEmklEG
mLYcvHsletuNRKDGGTdKFv/CWmS1rSpbza+WdyS4uYaDwXcUyFAZp6kRk+nl21Tj
171bM/HsuHNJ+eGZxRc7L/lGmS3Ee7ztBg+eybJVMcxiA4R5WOQVwsA7MPbVUwEP
Ta5dR003J9hSbGZFvNz6bqr4Q+79tLOtmuiEULNVxRf8VDSd6t/I0NpxKwMfMktI
R3GKhUI71pNTU3JmTVgBU2huV9k1GrUggdqEqJQy+h03m/12r5RqvWQwf520fne0
NAqnj7t9icF+sgqCdjlXcprujvp8ItXtAijF9Uma7tF4snshZehvcruuMdmLsjs=
-----END CERTIFICATE-----
It is very clear that this is in fact a certificate based on the first and last lines. The content of the certificate of course has been encoded in PEM format and we would need to type some command to view its content:
openssl x509 -in data.crt -noout -text -certopt no_pubkey,no_sigdumpThis provides us the output:
Certificate:
    Data:
        Version: 3 (0x2)
        Serial Number: 1681820658 (0x643e8bf2)
        Signature Algorithm: sha256WithRSAEncryption
        Issuer: C = QA, ST = Doha, L = Duhail, O = UDST, CN = Evil Instructor
        Validity
            Not Before: Apr 18 12:24:18 2023 GMT
            Not After : May 18 12:24:18 2023 GMT
        Subject: C = QA, ST = Qatar, L = Duhail, O = UDST, OU = 60061234, CN = Web Book Demonstration
        X509v3 extensions:
            X509v3 Subject Alternative Name:
                DNS:shop.supersuper.com, DNS:www.supersuper.com
Again, I have suppressed the public key and the signature. The signature this time is the real signature that was computed by the Evil Instructor who computed the SHA256 of the certificate and encrypted that number with the Evil Instructor’s private key. You can see that the Evil Instructor only issues certificates valid for 1 month. The important lines to verify are the DNS lines in the SAN extensions.
6.3.3 Intermediate Certificates
The certificates created by the website are directly signed by the Evil Instructor which is somewhat unrealistic on the Internet. Most certificate authorities create a self-signe certificate as the root but then they keep the private key off-line so that there is no chance that it could be leaked out to people. Instead what they do is create an intermediate certificate that is responsible for signing other certificates.
Let’s take a real certificate and look at it in detail. We’ll pick the current certificate for our sit.cna-qatar.edu.qa server: [image of certificate viewer from chrome]
The certificate as you can see has been issued to *.cna-qatar.edu.qa as it is a wildcard certificate for our domain. If you look at the SAN fields of the certificate you will see that it specifically lists sit and another server named webit on the same certificate. The issuer of this certificate is DigiCert TLS RSA SHA256 2020 CA1. If you look on the Details pane you can see in the hierarchy that this certificate was in fact issued by DigiCert Global Root CA. Because most computers have installed the ‘DigitCert Global Root CA’ certificate then the entire chain is trusted and we end up trusting the server’s certificate as well.
How did we end up trusting the root certificate? Your operating system manager (Microsoft of Apple) has decided that this root certificate can be trusted.
The validation of the certificate is written in the next section but it is a good point to talk about how things typically work. When your browser gets a certificate from the server the server might give just the server’s certificate or if could give the entire chain (the intermediate certificates). If the intermediate certificate is not provided then the browser must go and find it… some browsers are very good at this and will silently fetch it in the background; it is slightly slower but not much of an invonvenience to the user. Some clients (postman is an example) that will not be bothered to go and fetch intermediate certificates. The servers can be configured to include the intermediate certificates and this helps speed up the process.
6.3.4 x509 Certificate Validation
There are times where you will want to validate a certificate that you have received to make sure it is actually correct. Simply looking at the “issuer” and “issued to” statements is not actually sufficient.
We will start by just verifying that a certificate contains the public key that we can use with our private key. I have seen many situations in class where students have generated a CSR and private key, deployed the private key to their ssl folder in the server and then regenerated another CSR/private key pair because they spotted a problem with their CSR and forgot to copy the private key to the correct folder. When they get a certificate back, they try to deploy it and the web server software fails because the public key in the signed certificate doesn’t match the private key in their configuration file. While the error is usually quite clear, checking the certificate and the key before deploying can help reduce downtime on the server.
To check we use the openssl to extract the public key from the key file as well as the certificate file:
openssl pkey -in my.key -pubout -outform pem
openssl x509 -in my.crt -pubkey -noout -outform pem
You can then check that the result in both cases match. The output is quite long and what most people do is to run the output through a sha256 calculation instead:
openssl pkey -in my.key -pubout -outform pem | sha256sum
openssl x509 -in my.crt -pubkey -noout -outform pem | sha256sum
If you are feeling particularly paranoid, you can also extract the public key from the CSR:
openssl req -in my.csr -pubkey -noout -outform pem | sha256sumJust because the public key matches our public key, we still don’t know for certain that it was the real authority who signed the certificate. Do verify this we need to decrypt the signature using the authority’s public key. Luckily the openssl tool has a “verify” module that allows us to check this.
If we have just a single certificate which has been issued by a root authority the command format is:
openssl verify -verbose -CAfile evil_root.crt test.crtYou should of course get the root certificate from a trusted place. If somebody sends you your certificate and the root certificate, you probably shouldn’t use the root certificate; go to the authority’s web page and download the certificate yourself!
If you have an intermediate certificate, which is very likely if you are managing a real server, we can either verify the machine certificate against the intermediate and then the intermediate against the root:
openssl verify -CAfile intermediate.crt my.crt
openssl verify -CAfile root.crt intermediate.crt
Alternatively we can check it in a single command using the ‘untrusted’ option to form the chain:
openssl verify -CAfile root.crt -untrusted intermediate.crt my.crtOne danger of using the verify commands is that if the intermediate certificate happens to be self-signed, the verify command will claim the machine certificate as being okay! Generally if you have a bunch of certificates and you are trying to validate them, you would probably start by looking at the issuer names (use the -text option) and if they don’t make any sense then don’t both validating them either.
6.4 Deploying Certificates on Apache
Apache does not support SSL certificates immediately out of the box but of course it does actually support them, you just need to enable the SSL module. Inside the mods-available folder you will find the ssl.mod and ssl.conf files. These modules can be enabled by using the a2enmod command. The configuration file contains global SSL configuration options and we will look at this shortly but for now just leave all the defaults and instead lets look at how the default configuration file (default-ssl.conf) looks after we clean up the comments:
<IfModule mod_ssl.c>
  <VirtualHost _default_:443>
    ServerAdmin webmaster@localhost
    DocumentRoot /var/www/html
    ErrorLog ${APACHE_LOG_DIR}/error.log
    CustomLog ${APACHE_LOG_DIR}/access.log combined

    SSLEngine on
    SSLCertificateFile      /etc/ssl/certs/ssl-cert-snakeoil.pem
    SSLCertificateKeyFile /etc/ssl/private/ssl-cert-snakeoil.key
    <FilesMatch "\.(cgi|shtml|phtml|php)$">
        SSLOptions +StdEnvVars
    </FilesMatch>
    <Directory /usr/lib/cgi-bin>
        SSLOptions +StdEnvVars
    </Directory>
 </VirtualHost>
</IfModule>
The important directives are the SSLEngine, the SSLCertificateFile and the SSLCertificateKeyFile. Obviously if we do not swithch on the SSL engine then we will not be able to have a conversation. The other two directives are simply the files containing the certificate and the private key. These need to point to the actual location of the files.
The key file is of particular note. You should ensure that the private key is actually kept private. You could put the key anywhere on the file system but you would want to make sure that only the process www-data could actually read the key and nobody else, especially if your Linux system has actual people logging into it. Frequently I keep the keys in the folder /var/apache2/ssl but if you were running both nginx and Apache2 the /etc/ssl folder is probably better. The folder containing the certificate is not as important to protect as the key but you could apply exactly the same permissions for it.
The “snakeoil” certificate provided by apache is just a simple self signed certificate that you could use for testing and of course if you try to visit the server using this certificate it will fail because of the name on the certificate but you could at least see that the encryption is working. You could create a CSR for any name and then have it signed by the evil instructor if you wanted to try.
6.4.1 Itermediate Certificates
The current example of the Evil Instructor is not entirely realistic in the sense that it doesn’t follow the usual certificate hierarchy involving the machine certificate, the intermediate certificate and the root certificate. We we introduce the intermediate certificates there is one additional certificate along the way that we need to consider and how the certificate actually reaches the browser for validation.
When you get a certificate signed by a CA, they will usually include two .crt files. One of the files is the certificate for your machine, the other is the intermediate certificate. The CA generally doesn’t send you the root certificate because the operating system has probably already kept a copy of it in the trusted root store.
What do to with this intermediate certificate? This certificate can be placed into the same folder as your regular certificate and you would reference the certificate as the “chain file”. For example, the instructions that I received from one CA said this:
SSLCertificateFile /your/path/to/star_udst_edu_qa.crt
SSLCertificateKeyFile /your/path/to/star_udst_edu_qa.key
SSLCertificateChainFile /your/path/to/DigiCertCA.crt
The SSLCertificateChainFail is the intermediate certificate. When the client requests the certificate for the machine, Apache will also send back the chain file.
Although the intermediate certificate file contains only a single certificate, you can put multiple certificates into the file (just one after the other) in order to support multiple intermediate certificates.
If the CA fails to provide you a copy of the intermediate certificate, you can usually go to the website of the CA and they will provide you with copies of the intermediate certificates that you can download. I have had download intermediate certificates before when the intermediate certificate expired before the machine’s certificate was renewed.
6.4.2 Client Site Certificates
An interesting part of the TLS protocol is its support for client certificates that can be used to prove identity. Most websites on the internet only provide their own “server side” certificate as a way of proving who they are while the clients provide things like usernames and passwords. However it is possible to create certificates and deploy them to the client machines and then configure the web server to request certificates as an additional step in order to increase security.
The apache webserver does support the concept of client side certificates and if you look through the default-ssl configuration file you can find lines like this:
SSLVerifyClient none
SSLCACertificateFile "/etc/apache2/ssl/ca.crt"

<Location "/var/www/demo/secure">
   SSLVerifyClient require
   SSLVerifyDepth 1
</Location>
This configuration file says that no client verification is done for most of the pages in the website but any requests that are for items under the URI /demo/secure would require verification of the client’s certificate. When the browser tried to access something in the secure folder, the server would ask for the client’s certificate and then verify that the certificate was issued by the certificate given in ca.crt; if everything is fine then you get the resource as normal, otherwise you get an SSL error.
I have only ever had luck getting client side certificates to work under Firefox. The next section highlights what I did.
6.4.2.1 Firefox Client Side Certificate Experiment
The first thing that I did was to configure an Apache web server with a certificate issued by the ‘Evil Instructor’. This is just completely as normal but one surprise about Firefox is that it does not use the operating system’s certificate manager but instead relies on its own so you must install the Evil Instructor root certificate in Firefox. You will find this by going to settings and picking certificates. From certificate you can pick ‘Authorities’ and add the evil instructor root certificate there. This is the first thing and you need to make sure that basic https is working before trying to complicate things with the client side certificate.
I decided that I would only trust clients with certificates issued by the Evil Instructor so the Apache configuration became:
<VirtualHost *:443>
   ServerAdmin webmaster@localhost
   DocumentRoot /var/www/nodedemo
     ServerName hello.rford.inft3203.ccit.cna-qatar.edu.qa

     SSLEngine on
     SSLCertificateFile /etc/apache2/ssl/test.crt
     SSLCertificateKeyFile /etc/apache2/ssl/test.key
   SSLVerifyClient require
   SSLVerifyDepth 1
   SSLCACertificateFile /etc/apache2/ssl/evil_root.crt
   ErrorLog ${APACHE_LOG_DIR}/error.log
   CustomLog ${APACHE_LOG_DIR}/access.log combined
</VirtualHost>
The SSLVerifyClient indicates that we are asking Apache to verify all clients. The SSLVerifyDepth here indicates the number of certificates that the server will look at to determine if a certificate is valid. I used a 1 here because the certificates are being issued directly by the Evil Instructor. Finally, the SSLCACertificateFile has been set to be the root certificate of the evil instructor. In our case, the CA issues things to anybody but in a real situation you would make sure that clients do not get certificates unless they can prove who they are.
At this point, it is probably worth trying to visit the site. You should get a message like SSL_ERROR_RX_CERTIFICATE_REQUIRED_ALERT indicating that you need a certificate to visit the site.
The final part is to get an actual client certificate. I created a CSR that the Evil Instructor could sign. Unfortunately the Evil Instructor does require that the CSR contain the Subject Alternative Names (i.e. the DNS fields) so I just picked some random word; the browser will never look at. If I was using client certificates for a project I would more the DNS names from the request. The resulting certificate was downloaded as normal but unfortunately this is where normal stops and something new is required.
The browser needs to know the certificate and the private key and Firefox needs this to be turned into a format called PFX. We can do this using openssl
openssl pkcs12 -export -in myclient.crt -inkey red.cat.key -out myclient.pfxBecause this is combining the certificate and the private key, you will be asked for a pass phrase to keep the certificate secure. Unfortunately the pfx format is not like the PEM format and you cannot simply copy/paste the text but instead you will need to use scp to transfer the file to your computer.
With the certificate in PFX format on your computer, you can now go to the certificate manager in Firefox and import the certificate into the section called ‘Your Certificates’. Once you have the certificate put in place, you should be able to visit the website from before. If you delete the certificate you should go back to the error.
This type of client-side certificate is not a replacement for security but it can be used as an enhancement. I was working on one project where we were using client-side certificates stored on a secure USB drive with a small browser shim put in place. When the destination website was visited, the browser would prompt for the USB drive to be inserted and would ask for the pass phrase associated with the certificate. This created a two factor authentication scheme where the USB drive+certificate where required to be physically present.
Client side certificates can be quite helpful if you have one server that needs to access data from another service via HTTPS. This can be a better alternative to pre-shared keys (more of a web back-end programming topic).
6.5 Deploying Cetificates on nginx
The configuration of nginx to use SSL certificates is not particularly difficult with one small variation from Apache in terms of how to deal with intermediate certificates.
Consider the following section of an nginx configuration file:
server {
    listen 443 ssl;
    root /var/www/h2;
    ssl_certificate /etc/nginx/ssl/test.crt;
    ssl_certificate_key /etc/nginx/ssl/test.key;
}
The port that we are listening to is pretty clear and the ssl directive at the end of the configuration line is just a directive to nginx to use the SSL engine. There are some web pages on the internet suggesting to include a ssl on; directive but this is not actually current and is probably just an old version.
The ssl_certificate and ssl_certificate directives list the full path to where the certificate and the private key are located.
If you are using intermediate certificates (likely on a real website) you have a bit of work but it is possible that the signer has already done the work for you. The crt files that we have been using with Apache contain just one certificate but you can actually put multiple certificates together into a single file and this is what nginx is expecting. The file format becomes:
-----BEGIN CERTIFICATE-----
>>> Machine Certificate <<<
-----END CERTIFICATE-----
-----BEGIN CERTIFICATE-----
>>> Intermediate Certificate <<<
-----END CERTIFICATE-----
You can actually keep adding more certificates to this if you happen to be creating a long chain of trusted authorities. The order is critical, the machine’s certificate needs to be the first one, the certificate of the authority issuing the machine’s certificate must appear next, then the certificate of the authority issuing the intermediate certificate (if it is not a root) and so on.