7 Web Server Performance
Need a paragraph explaining about the importance of web server performance.
Much of the performance of a web application is more related to the application and the way it has been written, however the web server software itself can contribute additional overhead and it does contain some features that might help improve the performance of a slow application.
If you are reading this because you have a slow application and are looking for ways to make it faster, I would recommend that you instead start by figuring out what is actually slow. If your application is slow to show the page and your server is not heavily loaded this is pretty much an indication that the problem is your application and no amount of tweaking on the web server is going to help you. If you have a Wordpress or Drupal site that is lightly loaded and you just want the pages to load faster then you need to look at reworking the page layout (script tags in different places can have an impact on load time), use a CDN for some resources, implement caching, rewrite the theme (some themes use a lot of JS libraries that take several seconds to load in total) or consider replacing the CMS engine with something that works better for your case. This section is really more focused on situations where things are slow and your website is heavily loaded.
7.1 Static Web Sites
We will start with just static sites because dynamic web site performance is more about processing algorithms. We will talk about making a web application faster in the later part of this chapter.
A static web site is any site that is simply serving up static files such as HTML, CSS, and Javascript. This simplification will allow us to talk about the performance options available.
Like in previous chapters we will start by discussing the background theory of performance issues and then we can look at the two web servers, apache and nginx, after.
7.2 Handling Muliple Requests
Go back and take a quick look at the simple web server that I presented at the start of Chapter 2. The overall flow of this application is: wait for a connection from a client and process the request then close the connection and do it all over again. While this works when you have only a single client connecting to your server it doesn’t do very well if you end up with more than one request at the same time. Only a single request will actually get serviced at any given time and the others will have to wait.
If the “server” is busy reading and sending back the file for one client, all other clients must wait until it is finished. If another request comes in while the server is busy, it will sit in a queue to be processed once the current work is completed. By default the listen() function sets up a queue size of 128 but this can be changed if needed. If the queue is full then the client is refused a connection. Even if the client is put into the queue it is possible that the client may end up timing out before the server gets around to servicing the request.
Since many computers have multiple cores and/or CPUs we can use multiprogramming techniques such as threads and processes to handle multiple requests at the same time. When a request comes into the server we could create a new thread or a new process to handle the request. The programming of this new multi-threaded server is outside of the scope of this document (I might change my mind later but today as I write this paragraph I am not doing it).
7.3 Apache Specifics
7.3.1 .htaccess
The server configuration option called AllowOverride allows the server administrator to distribute configuration changes throughout a web server. Let’s first demonstrates why this feature exists then we’ll talk about the performance issues it creates.
Let’s suppose we have the following directory with some HTML files. If we configure a default Apache site with this as a DocumentRoot we would end up with directory listings of the files as shown in the image.
root@wsmdemo:/etc/apache2/sites-available# tree /var/www/htdemo/
/var/www/htdemo/
├── file1.html
├── file2.html
└── sub
    └── file3.html

1 directory, 3 files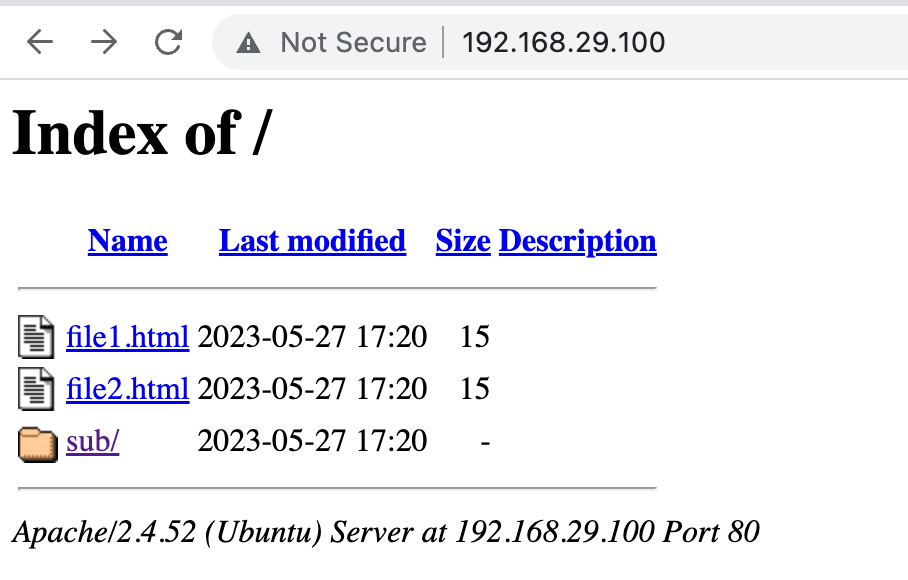
Let’s suppose that we wanted to allow the directory listing for the ‘htdemo’ folder but we want to prevent this for the ‘sub’ folder. We could implement this by removing the Index option in the sub folder using a normal configuration file:
<VirtualHost 192.168.29.100:80>
    ServerAdmin webmaster@localhost
    DocumentRoot /var/www/htdemo
    <Directory /var/www/htdemo/sub>
        Options -Indexes
    </Directory>

    ErrorLog ${APACHE_LOG_DIR}/error.log
    CustomLog ${APACHE_LOG_DIR}/access.log combined
</VirtualHost>
An alternative to this is to use an AllowOverride directive in the main configuration file such as this:
<VirtualHost 192.168.29.100:80>
    ServerAdmin webmaster@localhost
    DocumentRoot /var/www/htdemo
    <Directory /var/www/htdemo>
        AllowOverride all
    </Directory>

    ErrorLog ${APACHE_LOG_DIR}/error.log
    CustomLog ${APACHE_LOG_DIR}/access.log combined
</VirtualHost>
The directive AllowOverride is telling Apache to look in every folder for a file called .htaccess that will contain additional configuration options. If you were to put the Options -Indexes in an .htaccess file in the sub folder we would end up with the same result. The override directive doesn’t even require a server reload for it to take effect. Don’t become obsessed thinking this is going to solve a bunch of issues because it will make more issues than it is worth.
The first thing up is why does this exist? It is not because they though people would be lazy about not wanting to reload pages but it has more to do with allowing non-administrators to be able to perform basic configurations. This is very important in shared hosting situations where several people are sharing the same server but might need different configurations done such as URL rewriting and/or basic authentication. The directive I demonstrated is a little too flexible and we shouldn’t just say “all” but we could specify the types of configuration option that we allow the non-administrators to have access to.
So why is this being talked about in the performance chapter of this book? Remember what I wrote before, when apache is being used to AllowOverride, the server much check the contents of the .htaccess files in every folder along the path. For example if you try to open a resource like http://ipaddress/js/libraries/jquery/jquery.1.2.3.js the server will look for .htaccess files in the DocumentRoot of the site, the js folder, the libraries, folder and the jquery folder as well. All of this additional checking increased the amount of time it takes to get the actual file from the server. A lot of bad advice appears on the internet when installing content management systems such as WordPress and Drupal where they are suggesting that you allow override and then put configuration files into .htaccess files. You really need to take the content of the .htaccess files and move them into a configuration file unless you are on shared hosting where you just don’t have the choice.
7.3.2 Prefork MPM
The first approach we will look at is call the preform multi-processing module. This used to be the default but now the default is ‘mpm_event’. We will talke about it anyways but generally you probably wouldn’t actually enable this. When the service starts, a main process will be launched which then launches several child processes to serve requests. When a request comes in it gets directed to one of the child processes. The server tries to maintain several spare processes. A typical configuration file looks like this:
# prefork MPM
# StartServers: number of server processes to start
# MinSpareServers: minimum number of server processes which are kept spare
# MaxSpareServers: maximum number of server processes which are kept spare
# MaxRequestWorkers: maximum number of server processes allowed to start
# MaxConnectionsPerChild: maximum number of requests a server process serves

<IfModule mpm_prefork_module>
    StartServers                   5
    MinSpareServers            5
    MaxSpareServers           10
    MaxRequestWorkers        150
    MaxConnectionsPerChild   0
</IfModule>
According to the documentation provided by Apache they suggest that the default parameters are fine with the exception of the MaxRequestWorkers which could be increased if you are expecting a large number of simultaneous requests or reducing this number if your server has limited memory. The configuration above starts up 5 servers and always tries to keep between 5 and 10 spare servers ready.
Because this MPM module runs each copy of apache as a process if something happens to the process all the other ones continue to work. Most people wouldn’t use this unless they knew that their code was not thread-safe and needed to run multiple copies in separate processes. For those who took the operating sytems course you might remember that Python doesn’t run in multiple threads very well so this version of apache would be good if your backend programming language is Python.
7.3.2.1 Event MPM
This is currently the typical default in Ubuntu. As requests come into the main server, a thread is assigned to handle the work so that we can have multiple threads processing multiple requests. For those who have taken the operating systems course we know that threads use a lot less resources than processes so having 50 threads is generally going to use less memory than 50 processes but of course it does require that the software is written in a thread-safe way.
The multi-threaded appraoch could give you trouble if a thread causes the process to crash since it would end up taking down all other handling threads. Generally, you don’t need to worry about this as a web manager or even as an application developer but it is something that you should remember.
The configuration file is not that much different than the prefork version.
# event MPM
# StartServers: initial number of server processes to start
# MinSpareThreads: minimum number of worker threads which are kept spare
# MaxSpareThreads: maximum number of worker threads which are kept spare
# ThreadsPerChild: constant number of worker threads in each server process
# MaxRequestWorkers: maximum number of worker threads
# MaxConnectionsPerChild: maximum number of requests a server process serves
<IfModule mpm_event_module>
    StartServers                   2
    MinSpareThreads           25
    MaxSpareThreads           75
    ThreadLimit                 64
    ThreadsPerChild           25
    MaxRequestWorkers        150
    MaxConnectionsPerChild   0
</IfModule>7.4 Compression
Although most students these days look at zip file as a simple way of sending a folder of items in a file file by email, the ZIP file is also compressed to make the data smaller. In the days of very low capacity floppy disks and even USB thumb drives, compression was an absolute necessity because it was the only way that we could send large items and we would just hope that the compressed version of the file was small enough to fit on the storage media we planned to use.
The HTTP/1.1 protocol allows for the transmission of compressed files. The server compresses the file and the browser decompresses the file at the remote end just in time. A browser wanting to use compression will include the header “Accept-Encoding: gzip, deflate”. You can try this on the manual web client but the last time I tried the Mac version it just crashed completely (I’ll make a note to fix it).
Whether to use compression or not depends on the speed of the network and the speed of the machine doing the compression and decompression. If the amount of network time saved by compressing the files is less than the amount of time required to compress and decompress the data (maybe your server is old and slow) then you might consider disabling the compression on the server.
7.5 Chunked Encoding
Depending on the configuration of a website you might end up with a response like this:
HTTP/1.1 200 OK
Server: nginx/1.18.0 (Ubuntu)
Date: Sat, 15 Jul 2023 09:39:38 GMT
Content-Type: text/html; charset=UTF-8
Transfer-Encoding: chunked
Connection: close

ada
If you look at this response you will noticed two things, the first is that the Content-Length is not provided abut there is this new thing called Transfer-Encoding which has been set to chuncked. Rather than than the server getting the entire resource first to figure out the length, the server has elected to send back the data in “chunks”. The chucks appear below and could appear over time rather than all at once. I’ve left in the letters ‘ada’ which is the length of the first chunk (2778 is the decimal equivalent).
Consider the act of watching a video in a web browser. If we were to use the techniques we have been seeing in this course we know that the browser would issue a GET command but of course we don’t want to wait for the video server to download the entire video file to the browser before starting so the server breaks this into a stream of “chunks”. The player on the browser can start playing the chunks as they appear. There are many other cases there the size of a web page simply isn’t known at the start of the request. Think about a site that allows you to check the status of flights landing at an airport. A server implementing this likely uses a dynamic webpage written in some server side language so that when the visitor hits the page, the data in the database is looked up, a page is generated and then sent back. Imagine if this web page was quite large because you have a busy airport with a lot of requests from people checking the status. There will be a delay from the time the user hits the page until the page is generated. Rather than making the client wait until the full page is generated, maybe we could start sending the most recent flights first and then slowly add some more flights as the data is retrieved.
This is considered a performance item because it allows the browser to start showing things before the full page has been downloaded.
7.6 HTTP2
Although most upgrades to software is done to add new features, the upgrade from HTTP/1.1 to HTTP/2 came with significant performance improvements. Unfortunately it is more of a challenge to visualize what the differences are but we will attempt to summarize the performance improvements in this newer version.
If you use a browser such as Chrome, it is possible to view how many websites are actually using HTTP/2. To view this, bring up the inspect window and selected Network. In the list of requests, you can right-click and enable the “protocol” column as shown below:

In the image, you can see the protocol “h2” which means HTTP/2. I have purposely not upgraded the server on sit so that you can still see an HTTP/1.1 protocol. Most websites that support HTTP/2 are likely supporting HTTP/1.1 so if you try to use the manual web client, it will still work.
The original HTTP/1.1 protocol had some limitations The protocol only allows for a single item to be retrieved with each request. A browser can request to leave the connection open so that the TCP connection and termination handshake isn’t applied but if you need 5 files then the browser still needs to issue 5 GET operations and they need to be asked for serially (one at a time and you can only ask for the next request after the current one is complete). There were also limitations on the number of simultaneous connections between the browser and the server done in the browser; for example from what we see on the Internet the number 6 is very typical while the HTTP/1.1 specification actually says only 2 connections are permitted. People worked around these limitations by combining a lot of data in a single request and splitting their website up into multiple domains (for example, the HTML comes from html.mydomain.com, images from images.mydomain.com, etc.).
The HTTP/2 protocol solves a number of performance problems by implementing the following.
First, the protocol supports “multiplexing” where a single TCP connection can be used for all subsequent requests. The order of the responses is completely arbitrary. You might ask for a CSS file followed by an image file but parts of the image file might come back before parts of the CSS file.
The headers (i.e. Host, Connection, Cookie, etc) are transmitted in binary format rather than as ASCII characters which means that time is saved by the sending and receiving ends to avoid the conversion between the two formats and the overall size of the messages could be reduced. Take for example the header ‘Content-Type: application/x-www-urlencoded’. The server (or the browser) needs to scan the header looking for the line starting with Content-Type which would probably consist of code something like this:
for row in header:
  if row.startsWith('Content-Type'):
    processContentType()
However in HTTP/2 the header is reduced to just the value 31 so we can write code that looks like this:
for row in header:
  if row[0] == 31:
    processContentType()
Using a string startsWith() function is going to be much slower than using a single comparison for an integer value. This description is not meant to be an exhaustive coverage of how HTTP2 works but it gives an idea of what the designers were trying to accomplish. While it doesn’t seem like much, remember that a single web page usually involves a lot of requests and every little bit of savings helps.
One thing that can be done to optimize loading pages on the internet is to rearrange requests. I have seen some pages go from 4 second load times to 1 second load times by simply moving <script> tags towards the end of the page (script tags in the header cause the page page to block loading until the entire script is downloaded); the HTTP2 protocol allows for the server to make decisions about which items should be sent back first.
Finally, HTTP2 supports the concept of “server push”. What we learned in the early part of this course with HTTP is that data is only transferred as a result of a request. If you consider a typical web site the site contains a lot of JS and CSS files that need to be sent to the browser in order for the page to be displayed correctly. In HTTP/1.1 the browser would request the HTML file then look through the HTML file and decide that it needed a JS file and CSS file. In HTTP/2, we can configure the server so that when somebody asks for the HTML file, we send them the HTML file but we can also send the JS and CSS files without being asked for it because we know that the client is going to need it.
While the HTTP/2 push concept sounds very appealing, it was available for some time on most of the major browsers but it has been discontinued because the claims were that less than 2% of the websites managed to make use of it and it hasn’t been implemented in HTTP/3 either. The suggestion is that the 103 Early Hints response contained many of the same advantages and was much easier to implement. The nginx server with it’s latest version has also removed support for it.
Regardless of the state of the browsers here is one example without push on a small site:
 Then I reconfigured to push the main.css file when the index was asked for:

Unfortunately getting HTTP/2 to work on the manual web client isn’t really possible because the negotiation of the convertion from HTTP/1.1 to HTTP/2 happens in the TLS handshake and the manual web client doesn’t support it.
The nginx web server doesn’t seem to support hc2 (HTTP/2 over cleartext) but it is supported in Apache and you get get responses like this:
HTTP/1.1 200 OK
Date: Fri, 14 Jul 2023 13:25:14 GMT
Server: Apache/2.4.52 (Ubuntu)
Upgrade: h2,h2c
Connection: Upgrade
Last-Modified: Sun, 06 Mar 2022 21:21:37 GMT
ETag: "23a0-5d993553c7a40"
Accept-Ranges: bytes
Content-Length: 9120
Vary: Accept-Encoding
Link: </assets/css/main.css>;rel=preload
Content-Type: text/html
We can see the Connection of upgrade and the Connection method of h2 or h2c. We can also by the way spot the server push of the /assets/css/main.css file as well.
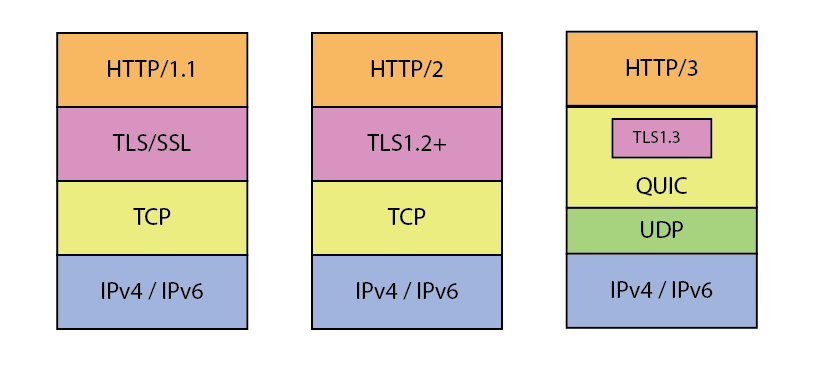
7.7 HTTP/3
The latest update in HTTP is HTTP/3 which is a complete overhaul. You can view HTTP/3 traffic using the Network tab of the inspect window (the protocol shows as h3). More and more sites are coming online supporting this version of the protocol.
The biggest difference in HTTP/3 is that it was modified to use the transport protocol QUIC (a replacement of TCP). QUIC was designed to be more effective for mobile devices which of course are becoming more predominant for a lot of applications connecting over 5G networks. The need for the change comes from the fact that when you are using a mobile device, there is a high probability that the end-user’s IP address will be switching frequently.
Although you have probably learned in your networking course that UDP was unreliable and that most applications use a TCP protocol, QUIC was developed to run on top of UDP. Why did they pick UDP? Simply because all existing network infrastructure (firewalls, routers, switches, OS kernels, etc) already supported UDP so it was an easy deployment. Building QUIC directly on top of the IP layer would have significantly slowed down the roll out of the protocol.
What do we get with QUIC? If we think about an HTTP/1.1 connection over TLS where you asked for “Connection: close” (which was exactly what we were doing in the first part of this course) each request would start with a TCP handshake followed by a TLS handshake, and then finally the HTTP request could be sent and received. This means that 3 client-server round-trip network requests would be used to get a simple page content. With QUIC we can start the TLS handshake immediately without the TCP handshake so that saves one round-trip. QUIC also supports the concept of 0-RTT which allows the browser to reuse and existing encryption key without having to renegotiate the TLS connection.
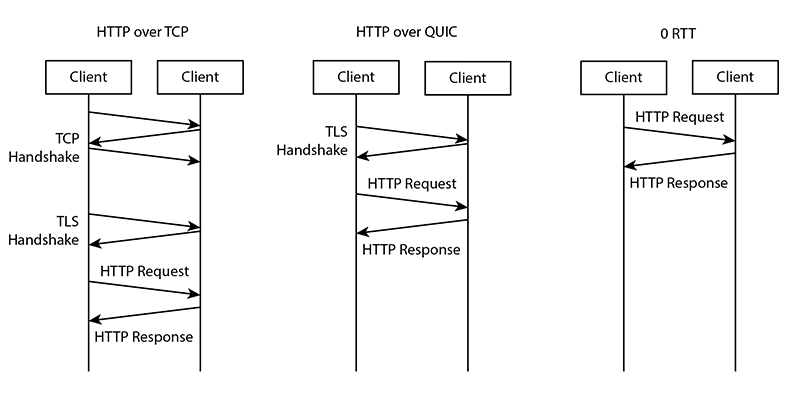
With QUIC, the browser can make multiple simultaneous requests, called streams, and if any packet is lost in one of the streams, only that stream is affected. This is possible because the underlying protocol is UDP. With HTTP/2 any packet loss in any of the streams would result in all the streams being halted due to the TCP sliding window.
The Apache server does not support HTTP3 and according to comments found on line it probably never will! The nginx server on the other hand does support HTTP3 so it is expected that Apache will end up becoming obsolete in favor of nginx or the new LightSpeed server which claims to support Apache configuration files directly. This means a rewrite of this book where Apache becomes the second class citizen!
7.8 HTTP2 on Apache
The module named http2 needs to be enabled and you will get support for HTTP/2 with the exception of the server push items. If you look at the http2.conf file you will find this line:
Protocols h2 h2c http/1.1 which can be read in the order of preference. If you move the http/1.1 to the start the server will not make suggested upgrade responses for everything.
7.9 HTTP2 on nginx
Enabling HTTP/2 on nginx is relatively straightforward. Consider the following configuration file:
server {
    listen 443 ssl http2;
    root /var/www/h2;
    ssl_certificate /etc/nginx/ssl/test.crt;
    ssl_certificate_key /etc/nginx/ssl/test.key;
}
This will allow for http2 over ssl. You will be able to see this by looking at the protocol in use in the browser for the resources. In chrome the letters ‘h2’ will appear instead of http/1.1.
I will not talk about the HTTP/2 push features given that they are being removed.
7.10 Servers Supporting HTTP/3
It seems that the expectation is that Apache will never support HTTP/3. The nginx server does support it but not the version that shows up with Ubuntu. You can easily compile the latest version from source or use a PPA to install the latest. I was able to sort of make 1.25 work but in Wireshark, the traffic was being listed as UDP instead of QUIC when using Firefox but when using Chrome, it refused to switch away from HTTP/1.1. I need to perform some analysis to find out why the incorrect protocol was showing with chrome but likely it is related to the same problem of UDP vs QUIC in wireshark.
The new player in town is openlitespeed which does support HTTP/3. Unfortunately I wasn’t able to compile this on my M2 Mac so I have no proof that things work yet but I will update this section of the book once I have things working. I was able to make openlitespeed work on an Intel VM but could not get the protocol beyond HTTP/2; more work is required to find out why.
7.11 Load Balancing
In most web application the majority of the requests are not for simple files but rather to interact with some database. The incoming message needs to be decoded and routed to a specific code that is written to handle the request. Then the code usually needs to update and/or fetch data from the database, manipulate the data into some useful form for the application then finally the page or data is sent back to the client.
One of the bottlenecks in processing the request is the actual language processing itself. If you find that when you do your performance loading that the CPU is the problem, a very typical way of fixing it is to just add more CPUs! Of course you can’t usually just open the cover and stuff another CPU into place but what you can do is configure a load balander that will split the load over multiple servers. If each server can handle 5000 simultaneous requests then 2 servers would in theory be able to handle 10,000 simultaneous requests.
We will call the server that can actually process the requests as the “application server”. The application servers will generally still have a basic web server to allow for HTTP conversations between the load balancer and the application server but other communication protocols could be possible.
Suppose that we have a load balancer and 3 application servers. We could configure the first request to be sent to server 1, then the next request to server 2, the next to server 3, the next back to server 1 again.
The number of application processing servers can easily be scaled up or down as needed. If we know that we will be seeing a huge spike in access we could easily spin up additional application procesors in advance or we can even write something to monitor the application servers and automatically add more as the CPU usage goes high.
In addition to handling the higher demand, the load balancing approach also gives us the ability to handle failed applications servers and the overall system can just continue to work.
One very useful technique is to “terminate the ssl” at the load balancer. If your data center is secure, there is no reason to pass the requests between the load balancer and the application servers using HTTPs, it would only increase the amount of work on each request reaching the application servers. Of course we need to ensure that the network is in fact secure between the load balancer and the servers.
7.12 Database Performance Improvements
The database is a very critical part of any web application. Just about every page that the user interacts with either reads something from the database or writes something to it and read some more data.
This section is not meant to cover database performance as it it a complete course on its own. I will just mention the technologies that are possible and show some images of what is happening.
One of the first things that you should consider with a very busy website is to remove the database part from the application server completely. The system requirements for a database server are quite different than a web application and it needs a different type of tuning as database servers often need very fast disk access and perhaps a lot of memory to try and keep things cached in RAM.
If a single server database is not fast enough, the concept of load balancing also exists for database servers but they go by one of two names, either replication or clustering.
7.12.1 Database Replication
Most applications tend to have a lot of reads compared to the number of writes. If you think about a website like amazon.com, you know that a lot of people simple browse the site to find out prices and read reviews of products but a lot less people actually buy items in comparison. A very typical trick is to have one master database where the data is written and have multiple copies of slave databases where the data can be read.
A replication solution does allow for minimal fail overs. If a slave fails, it is easy enough for an application server to just switch to another slave. If the master fails, the slaves at least have a relatively up-to-date copy.
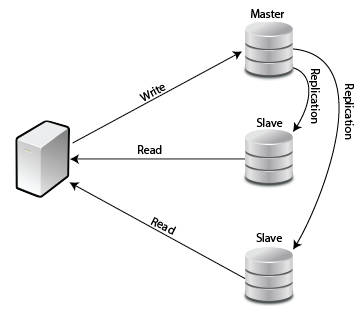 Even with a single application server, having the reads split over two databases can help because two SQL select statements can be processed at the same time. This does require some load balancing library on the application server or else you can set up a TCP load balancer between the application server and the slaves.
7.12.2 Database Clustering
An alternative to database replication is the concept of database clustering. In clustering you have a collection of data nodes all connected with a very high speed replication network. When a request comes into the cluster, the front end server forwards the request to one of the processing nodes (just like load balancing), the processing node completes the request and if there are any changes required the changes are pushed in real-time to all the other nodes.
Most database cluster allow for failover of processing nodes,
7.13 An Example
It is great to talk about performance improvements but can we actually implement the suggestions from this chapter of the book and actually manage to improve something? I decided to give it a try and I’ll report on whatever I end up finding even if it is not a good result!
We need an application and of course a way to test it under load. We have the HijackBank application so this will be our application and we will use jMeter to do the load testing. On campus we have access to a server with a pair of 16 core Xeon CPUs where we can create a bunch of VMs. so we will use that. Unfortunately the disk storage on this particular server is a set of 8 10k RPM SAS drives configured as RAID10; a set of SSDs might provide better support.
I didn’t bother with any work on HTTP/2 for this test. The jMeter application doesn’t support HTTP/2 directly without some plug-in and even if I installed this plug in, I am not expecting any improvements given that everything is basically a local connection and I was more focused on the application throughput.
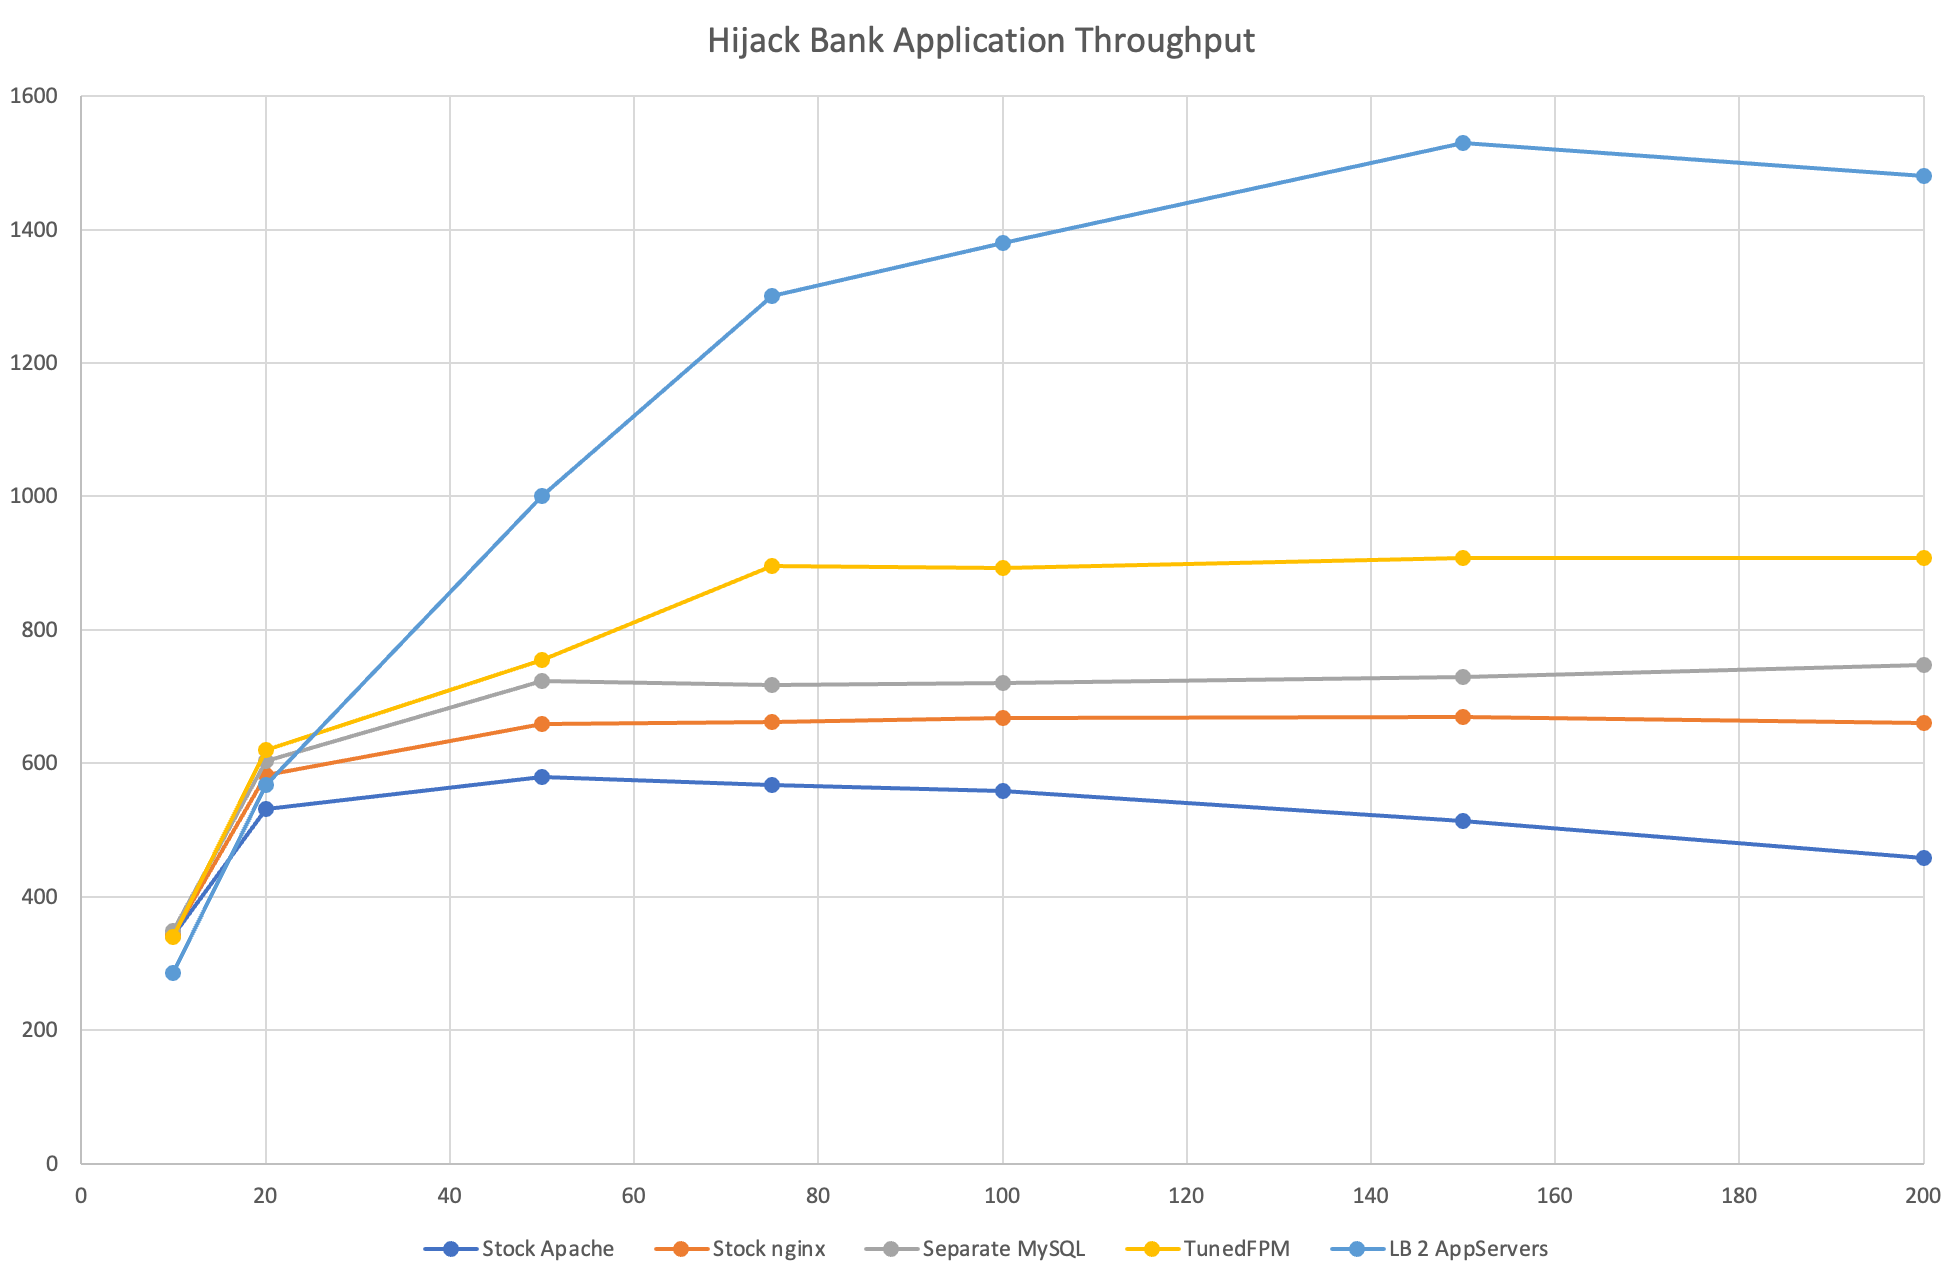
Here are the results from the my experiment. The descriptions are from the “bottom up”.
7.13.1 The Software
The initial software was written using PHP/MySQL because that is the server that I had access to. I used the standard sessions from PHP and this needed to be reworked so that we could eventually load balance the solution. I decided to rework the software to use JSON web tokens; there was a cost to work as it required modification to several parts of the software and of course a bunch of testing.
Remember that JSON web tokens are tokens generated by the server and digitally signed. If somebody attempts to manipulate the token values the server will find out because the signature will not match. Although web tokens generally should not be put into cookies, I decided to use cookies because it was easier than trying to modify the application to use bearer tokens. I will spare you the details of the changes but because the application is relatively small the changes were done in around 20 minutes.
7.13.2 Baseline Testing
The first test that I performed was to just deploy the stock Apache web server. I decided to include the SSL certificate from the start since the negotiation of TLS is finitely included in real life web applications. I used FPM-PHP as the PHP processing module since I knew I would be switching to nginx immediately after.
I ran jMeter for various numbers of threads (10, 20, 50, 75, 100, 150, and 200) and filtered out errors. I ran each test for a minimum of 1 minute and then took the throughput reading after the numbers have more or less stabilized.
After collecting the data points for Apache2, I installed nginx and reran the tests.
One interesting thing that appeared during this baseline test was the number of network errors under Apache2 and the resulting decrease in throughput. You can notice as the number of simultaneous users increased beyond 75, the throughput started to decrease. During the test, the number of network errors leading to disconnections started around 50 and became quite prevalent towards the very high load numbers. These errors were simply not present for any of the tests under nginx. Another important item to note was that the CPU was completely maxed out on my server starting around 50 users.
An important thing when tuning a web server to find out what is the bottle neck and make modifications based on this rather than just going for some sort of suggestions from online. For example, the RAM usage was nowhere near the capacity so the naive approach of adding more memory would not have helped at all.
Since I had nginx installed, I decided to tweak the parameters called worker_processes and worker_connections. The worker_processes configuration was set to “auto” which meant in my case that 2 copies of nginx were running because I had 2 CPU cores. The number of worker connections was set initially to 768. Modifying these values to anything else generally lowered the throughput a small amount. This was not unexpected because the CPU was already maxed out. If I had increased the number of CPU cores then certainly we would have been an improvement. I put all of the default settings back to their defaults before moving onto the next step.
7.13.3 Database Server
While running the high loads on the baseline configuration, the mysqld process was found to be using the most CPU. I decided to take the database and move it to a separate server so that I would isolate the CPU used by the web application and the CPU used by the database.
A few changes were required to the connection string (instead of localhost, I put the IP address of the database server) and of course the user on the database had to be created using
create user badbank@'%' identified by 'lljlkjl';to allow for the user connection from an outside client and a small tweak had to be made on the mysql configuration file to allow the server to listen to the IP network address rather than localhost. Although MySQL does support encrypted connections, I decided to leave everything in clear text in order to make the communication between the web application and the database server be as fast as possible. This is an acceptable approach providing that the network between the application server and the database is trusted
The result of the rework was that the web application server’s CPUs ran around 70% and the database CPUs were around 40%. The performance increased slightly. I suspect that the increase came from the CPU on the application server not having to be shared with the database server.
7.13.4 PHP Tuning
I did experiment once again with the worker_processes and worker_connections at this point but no change was observed in either the throughput of the CPU utilization.
I noticed that under load, only 5 PHP processes were running. Since I was trying to maximize the CPU usage, I looked through the www.conf file for php-fpm and found:
pm.max_children = 5This configuration item says to run only 5 processes in the pool. I modified this number until I got the CPU utilization to 100%. For my particular server the number 12 was picked. Any further increases did not increase any performance. The other values in the php-fpm configuration have to do with how many processes are started and how quickly things ramp. I just left the other values but you could increase the starting number if you wanted to.
The result was a 25% increase in throughput compared to the baseline configuration. The most important lesson from this adjustment is that a web application is both the web server as well as the scripting language and the scripting language processing likely has much more impact on performance that basic web server tuning.
An interesting modification that I want to try is to rewrite the application if different languages and perform the tests on the same server. I would really like to see the application ported to Java/C# and NodeJS. I do have a NodeJS version of the application but it uses MongoDB instead of MySQL. The result was quite a bit better but a lot of the performance improvements probably came from the way the data was stored in the database. I don’t expect much of the difference came from the language but it would be interesting to compare a compiled to a non-compiled language and perhaps this is my task.
7.14 Load Balancer
Given that I am not going to rewrite the application in a different language, I decided that given our application server was now maxed out with the 12 PHP processes, there isn’t much tuning left except to find a way to scale up by using multiple application servers and a load balancer.
I decided to start with only 2 applications servers and a load balancer. The configuration for the load balancer was just:
upstream hjapp {
   server 192.168.30.102;
   server 192.168.30.103;
}

location / {
   proxy_pass http://hjapp;
}
The TLS connection was terminated at the load balancer and plain HTTP traffic was sent to the application servers.
Under light load conditions the throughput was actually reduced a small amount. This is not surprising given that each request needs to pass through two servers. Under heavy loads, this load balancing technique immediately starts to stand out a serious improvements. From the graph, you can see that at 200 users the throughput has reached 1500 req/sec compared to the 660 req/sec that we started with when we had a single server.
Could we get even more throughput if we increase the number of application servers? I didn’t bother adding more because with the load of 200 simultaneous connections I noticed the the MySQL server was completely maxed out. Adding more application servers is not going to increase the throughput at this point unless we can make the database server faster. We would either increase the power fo the database server (additional CPU cores would be the biggest improvement) or we could go for a replication or clustering approach.